
Brian Long Consultancy & Training Services
Ltd.
January 2012



This article looks at how get Google's map control working in an Android application, specifically using the Oxygene for Java development tool from RemObjects (a tool seen by many as a Delphi compiler for Android). The reason behind this article is that the map control is not part of the standard Android library - it's in an add-on library. Consequently there are various steps required to make use of the library, and additional steps that Google require of you before you can successfully get the map control working in your app. We'll run through all these and see what features the map library offers us.
Running through the required list of steps you may conclude that it's a convoluted process adding an interactive map onto an activity in your Android project, and it's true that the setup is a little tedious. However once you have a template application that uses the map control, things are rather more streamlined after that. Hopefully the detail in this article will make the process clear enough to become relatively straightforward.
If you are new to Oxygene for Java, follow this link to an introductory article on using it to create Android applications and this link for coverage of Oxygene for Java's inline interface implementation syntax.
The accompanying source project is available through this download link.
As intimated in the introduction the Google map control is
not part of the Android Open Source Project (AOSP). Instead Google Maps is an external library, the com.google.android.maps
package, which is available through the Google APIs add-on for the Android SDK. To use the MapView control from the Google Maps library we need to follow the steps
below, each of which is explained in plenty of detail to explain what's
going on.
Steps:
Let's now take a look at what each of these steps entails. Take a deep breath - we're going in!
Whilst the Maps external library is not part of the Android project itself, the Android SDK Manager has been set up to locate and download it, if required.
Note: the open source Android project itself does not include the Google Maps library, however it is expected that any physical Android device will have the Google Maps library installed. So installing the Maps external library is really for the benefit of the compilation cycle - it allows Oxygene for Java to compile against all the classes defined in the Maps library and successfully resolve references to the symbols from it. When Oxygene for Java links our application we will not require it to include the Maps library in our Android package - that could yield deployment errors thanks to us trying to install a duplicate class.
Assuming that you added the Android SDK tools directory onto your Windows PATH then
you can invoke the Android SDK Manager by running the android.bat batch file from
the Windows Run... dialog (ÿ+R).
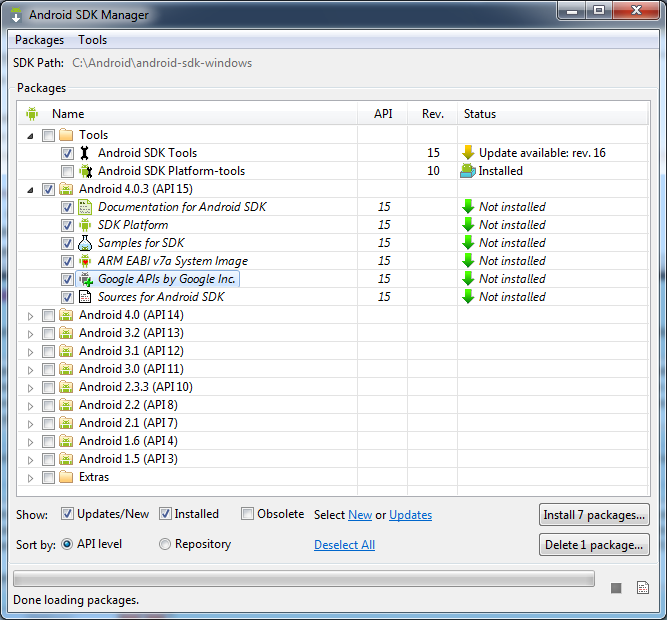
For any Android API levels you wish to install you must be sure to check the Google
APIs by Google Inc. entry - this includes the Maps external library.
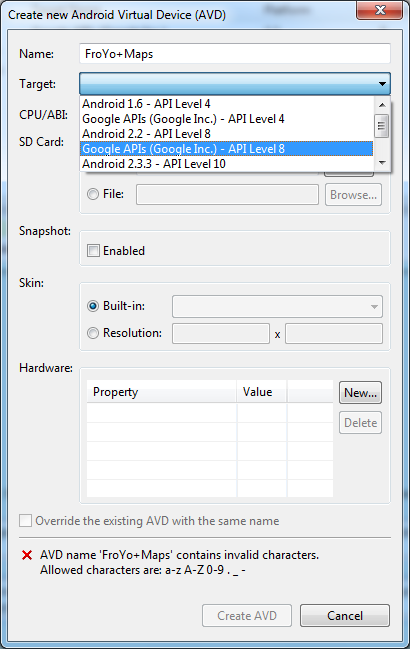
Note: while physical Android devices will have the Google Maps
library installed, any emulators (Android Virtual Devices or AVDs) that you set
up will only include the Maps library if you specified Google APIs as a target when
creating the AVD. For example in this screenshot you can see the Target lists
out the regular versions of the Android APIs that are installed as well as versions
that include the Google APIs add-on. The item selected will create a FroYo (Android
2.2, API level 8) AVD that has the Google Maps library included.
You get to the Android AVD Manager by running android avd from the
Windows Run... dialog (ÿ+R)
To work with the MapView control we need to add a reference to the maps library
into our project. So starting at the beginning we need a new Android project:

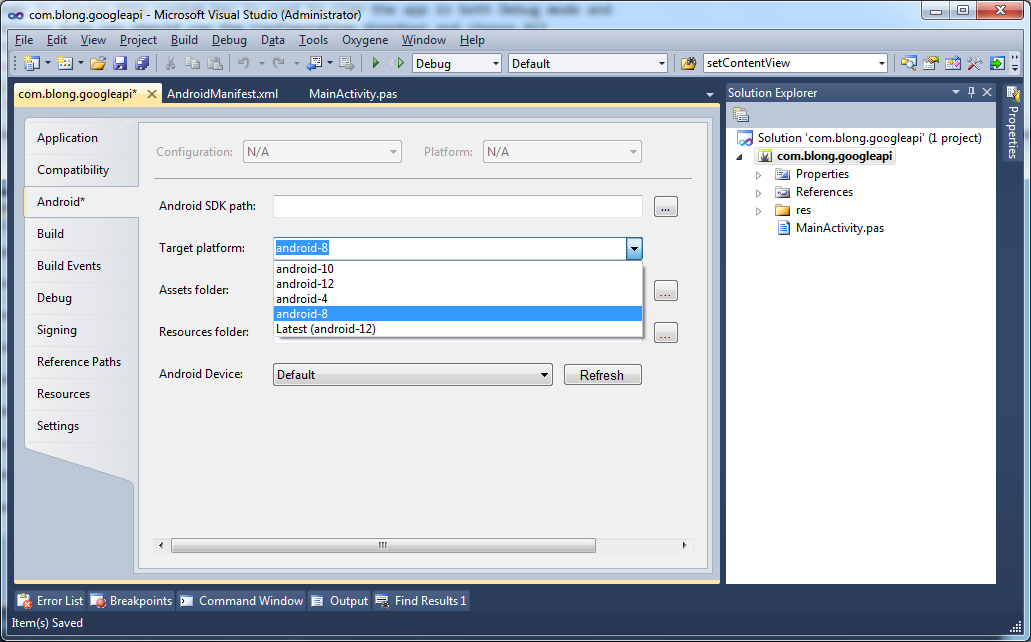
Then we need to choose which Android version we will be compiling against. This is selected in the project options on the Android page - choose whichever API level you want, being careful to pick one that has the Google APIs add-on downloaded for it. Here I've chosen Android 2.2, or API level 8.
Now we must add a reference to the maps library. This can be done using Project,
Add Reference... from the main menu or by right-clicking the References node in
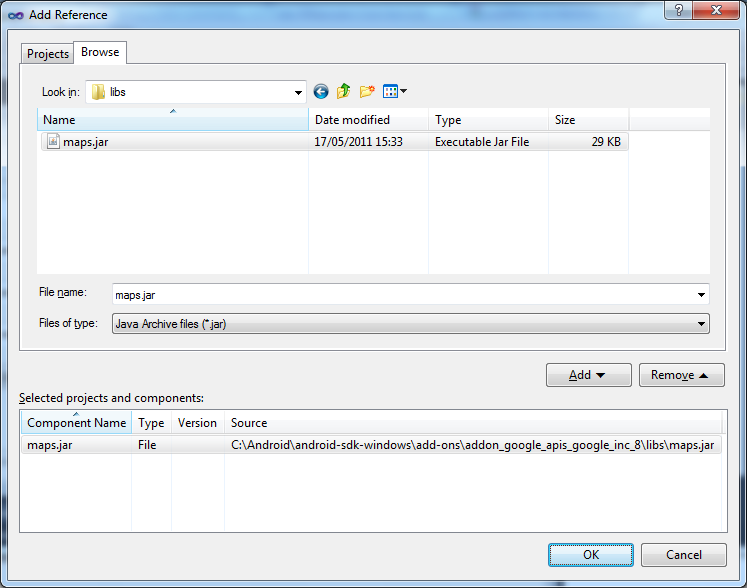
the Solution Explorer and choosing Add Reference... In the dialog that pops up
brows to your Android SDK directory, then into add-ons, then into the Google
APIs directory with the suffix that matches your chosen Android API level. Since
I chose API level 8 I'll be going into the addon-google_apis-google_inc_-8
directory. Under here browse into the libs directory and select maps.jar, press
Add then press OK.
Now the Maps external library reference should have been added to the project.
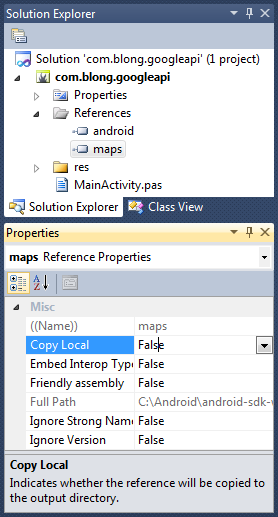
Note: the Copy Local option for a referenced library defaults to
False. For the Google Maps library reference (and also the main android
library reference) it should be left as False. Setting Copy Local to
True would cause the compiler to copy the library into the project
directory tree and include it in the Android application package, which we do not
want to happen. Remember that the Google Maps library is already on physical Android
devices and emulators that have been set up appropriately. It would cause problems
to link the library into your application package and deploy what would be a duplicate
library.
On the other hand, this setting is very important to remember when dealing with
any other miscellaneous Android libraries that you want to use in your application.
When linking to some custom third party library you will need to set Copy local
to True to ensure the library is included in the Android application
package so that when deployed the library code is present and can execute.
In order to have Android load the shared maps library from the device when our
application starts (thereby allowing us to access it at runtime) we must specify
in the Android manifest file that we are using it. The manifest file is in the
project as Properties\AndroidManifest.xml and we need to add a
uses-library
element within the application element, specifying the package name of the
shared library like this (see line 9):
By taking this step, the Android package manager will check that the specified library is present on the device when installing the application and refuse to install it if the library is absent. Additionally the Android Market won't display published applications to a user that doesn't have the library installed.
The MapView control (or widget) is designed to use the Google Maps
API and display a map by downloading map tiles from the Google map servers, displaying
them as appropriate. This, of course, entails making use of an Internet connection.
Because we will need to use the Internet connection we need to advertise this fact
clearly by adding a suitable permission requirement into the manifest file. If the application
ends up on the Android Market then any potential user will be informed before downloading
and installing the app that it requires permission to use the Internet and therefore
the user will be aware that, for example, they might need to ensure they have a
suitable data plan in place, or to just use the application when connected to a
Wi-Fi network.
There are many permissions defined for various aspects of Android application
development and they are requested by adding uses-permission elements to the Android manifest
in the manifest element. We request Internet permission by changing our manifest
file like this (see line 18):
Go back to the top of this page
Go back to start of this article