
 N
N)
or press the Start a New Solution link on the welcome screen.

Brian Long Consultancy & Training Services
Ltd.
March 2011
Accompanying source files available through this
download link
For our first foray into iPhone application development, tradition dictates we do
a Hello World program. In MonoDevelop choose File, New, Solution… (or press
)
or press the Start a New Solution link on the welcome screen.![]()
![]() N
N
Here you can see the various MonoTouch project templates available. We’ll start off with a window-based project, since a Hello World will just have a single screen.
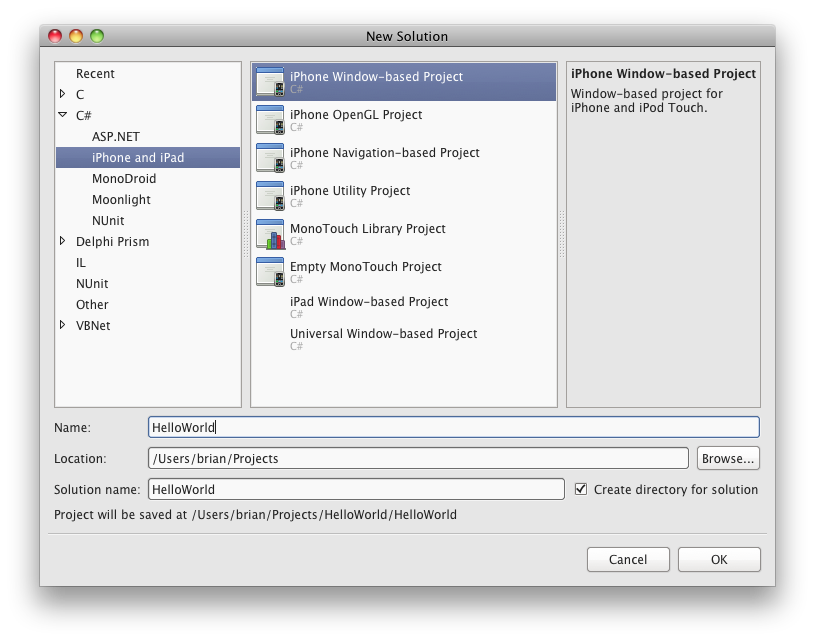
This creates a solution containing a single project made up of various files. As with Visual Studio a solution is a means of managing potentially multiple projects.
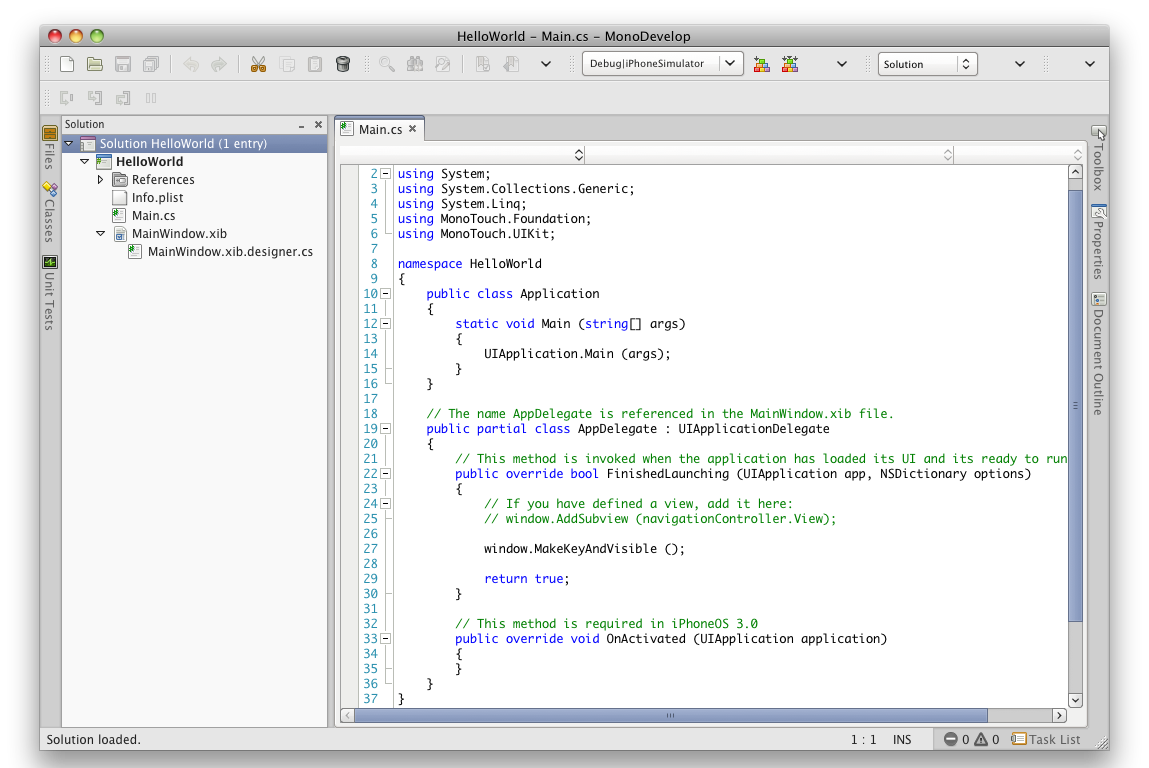
Info.plist is a property list file used to set various properties of interest to iOS. We’ll ignore this for now (we'll come back to it later).
The important file is Main.cs; this is where we will be writing code. The simple
Application class contains a class method Main that is
the application’s entry point. AppDelegate is a bit more interesting
– it represents a delegate for the underlying CocoaTouch Application object and
can respond to Application events, such as the FinishedLaunching event
that triggers when the app has loaded up and which typically contains initialization
code.
CocoaTouch operates with an MVC model and this delegate model crops up regularly, for example with event handlers for UI controls.
Talking of UI controls, we need to set up a UI. The MainWindow.xib file represents the UI; when double-clicked it will be opened in Interface Builder, a tool you’ll be spending some time with as you work with MonoTouch projects.
Note: Originally, Apple UI files were binary and used a .nib extension. When building iOS applications the UI files are XML and use the .xib extension. It is common for OS X and iOS developers to refer to both .xib and .nib files simply as nib files.
Just before looking at Interface Builder I’ll point out the other source file in the project. MainWindow.xib.designer.cs is an auto-generated file that contains code necessary to access parts of the UI, referred to as the .xib’s code-behind file. We’ll take a look at it again presently.
Interface Builder is one of the tools from Apple’s Xcode development tool suite and is where we build the UI design part of the iOS application. Which solution/project template you start with dictates the size of the window you get to design, as the resolutions are different. iPhone and iPod Touch are 320x480 whereas iPad is 1024x768.
Note: iPhone 4 has a higher resolution screen than iPhone 3 at 640x960. That is an increase in pixel resolution but, when measured in points, all iPhones offer a 320x480 resolution. This means you only need to design the UI once and it works on all iPhones.
When your .xib file opens in Interface Builder you are presented with four windows, as illustrated in the screenshot below. We will need to gain familiarity with each of these so let’s look at them one at a time.
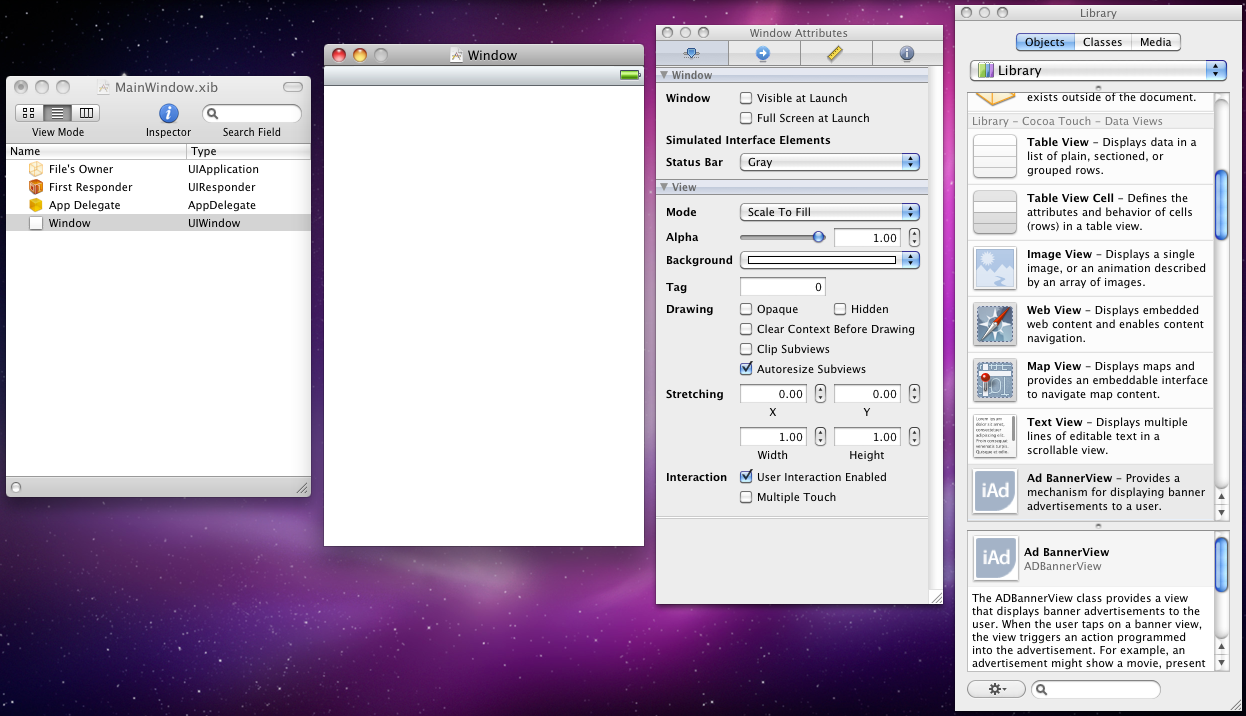
The first one is the Document Window and lists the key items from the .xib file
and allows them to be selected. The important ones to note right now are the App
Delegate, which tallies with the AppDelegate class in the source file
from earlier, and also the Window, which represents your application window (of
which you have one in a new window-based project).
The second one is your application’s window and it is made active if you double-click the Window item in the Document Window. This window is sized appropriate for your iOS target device (in this case the window is 320x480). If you look carefully at the screenshot, you’ll see that at the top of the window is a representation of the iPhone’s status bar. This window is essentially a form designer, and will reflect our UI as we build it up by adding controls and views.
The third window is the Inspector and serves the same purpose as Visual Studio's
Properties window. It has 4 pages, selectable by the buttons at the top or by menu
items. If you check the Tools menu you’ll see that
selects the Inspector window, with whatever tab is currently active. However ![]()
![]() I
I
,
![]() 1
1
,
![]() 2
2
and ![]() 3
3
specifically select the Attributes Inspector, Connections Inspector, Size Inspector
and Identity Inspector respectively, as the four buttons also do.![]() 4
4
The Attributes Inspector offers up miscellaneous properties and the Size Inspector lets you play with the size and anchoring of the selected control. The Connections Inspector is where we’ll hook up outlets and actions, as we’ll see momentarily.
The fourth window is the Library. Again, buttons at the top switch its mode. The Objects button shows all the objects you can add to the window and the Classes button lists all the classes available (the Media button is unimportant for our purposes). In either mode there is a Search box at the bottom of the window that filters the potentially long lists shown by default.
The UI of this starting app will require two Labels (UILabel controls),
a Round Rect Button (UIButton) and a Text Field (UITextField).
To find these input controls in the Library window ensure the Objects button
is selected then use the drop-down control to show only Inputs & Values
(as opposed to the full library of CocoaTouch and custom objects, which is selected
by default). This cuts down the list considerably and so you should be able to find
the controls readily – they are all adjacent in the list. Again, you can also use
the search box to search for the class name or the description (though that resets
the drop down filter to show the whole library once more).
Drag the controls to the form and arrange them as below. You can edit the text in
all these controls either by double-clicking the control, or using the Text or Title
attributes, as appropriate, in the Attributes Inspector (![]() 1
1
Note: The Status Bar setting is described in Interface Builder as a Simulated Interface Element, so shows you what it might look like, but won’t have an effect at runtime. To finish the job we need to do it in code, and we will.
The text field will automatically pop up a keyboard when tapped (we shall see later that, whilst the keyboard will automatically pop up, it is down to the programmer to dismiss it) and there are various attributes we can configure in the Text Input Traits section of the Attributes Inspector. In this case set it to capitalize words and set the Return Key attribute to Done, which changes the normal Return button on the keyboard to be a highlighted Done button instead.
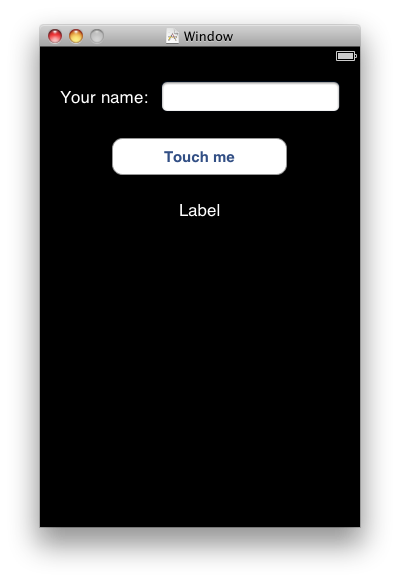
That’s the UI designed, but before leaving Interface Builder we need to cater for the programming that comes next.
The code will need to read from the text field and write to the bottom label (and also, just to prove we can, we’ll be writing to the button as well). In order to access the controls we need to define the variables that will refer to them, which are not created by default. These variables are called outlets and are defined in the Library window on the Classes page.
You’ll recall that in this application the App Delegate is where the code will be added, so we need to add the outlets to this class. To locate the App Delegate on the Classes page of the Library window, either use the drop-down box, which lists all available classes, and scroll around till you find it, or scroll up and down the main list on the window, or alternatively you can use the search box.
When selected you see an uninformative inheritance diagram in the lower half of
the window. Using the drop down box in the center of the window switch to the Outlet
view where you’ll see one outlet already defined for the window object. Now use
the + button to add in an outlet for each control of interest.
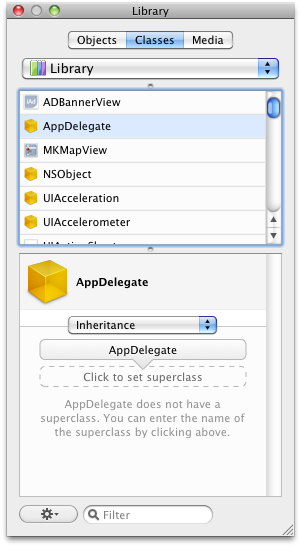
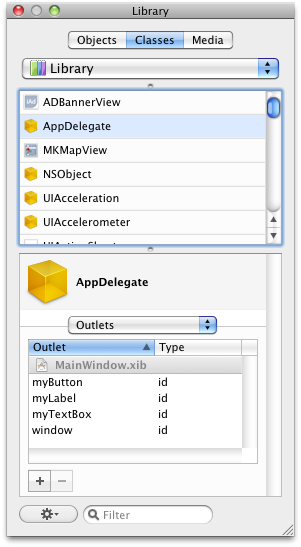
The variables are now defined but we haven’t told Interface
Builder what they each represent so we need to connect the outlets to the controls.
You do this by selecting the object that defines the outlets (select the App Delegate
in the Document Window) and then use the Connections Inspector (![]() 2
2
To connect an outlet to a control you move your mouse over the little circle to the right of the outlet whereupon it turns into a plus, then you click and drag from there and drop onto the control. You can see the label outlet being connected below.
Set the three outlets up and then we can consider what happens with events.
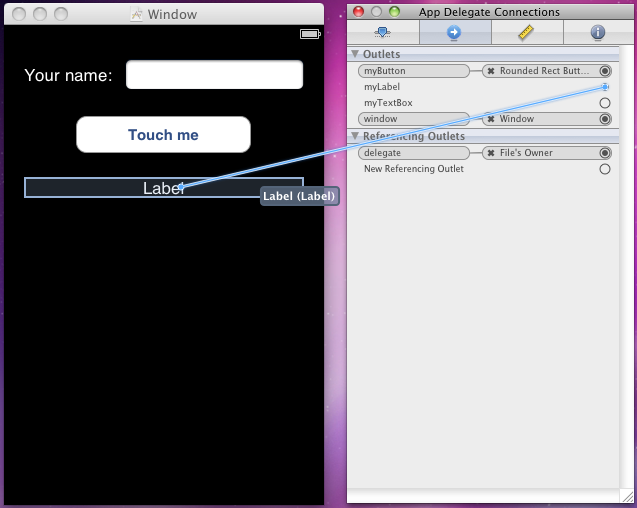
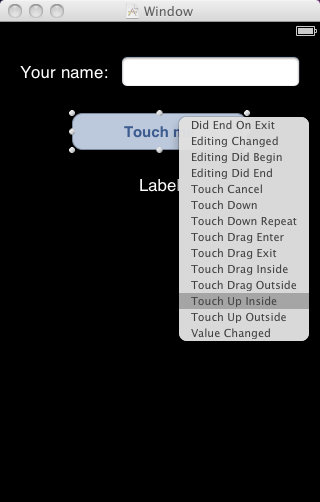
The CocoaTouch controls available in Interface Builder have various events that can be responded to as you’d probably expect. However when using MonoTouch we have a choice of two ways to set up the event handler. One way requires an outlet to be set up in Interface Builder and then uses normal .NET-style events in the source code. The second way matches the traditional Cocoa programming model and revolves around actions and we’ll look at this approach just now.
An action represents a method that gets implemented in your class but is connected to a control’s event in Interface Builder. You set up an action in Interface Builder in a similar way to defining an outlet - the Library window allows you to choose an Actions page for a selected class. We’ll need to add an action to the App Delegate.
Note: these actions are sent around from within the underlying
CocoaTouch library (the event handler method in your code maps down onto it) and
so have the same rules as when programming in Objective-C. Since all these events
tend to have parameters the Objective-C requirement is to ensure the action has
a colon as a suffix character, so in this case you could add an action called
myButtonPressed: and that will work out okay. Omitting the colon won’t
cause an error, but the code won’t execute as you would expect.
To hook the action up to an event you can do it in one of 2 ways. Firstly, you can locate the action in the Connections Inspector for the App Delegate (it’s in the Received Actions list) and then drag it to the relevant control (the button). This will produce a popup list of all the events (see screenshot to the right) and the one we probably want is the Touch Up Inside event, such that it triggers when the user touches the button and then moves their finger away.
The other way to hook up the action is to select the button, so that the Connections Inspector shows all the available events in a list, and then drag the required event to the App Delegate on the Document Window. This produces a popup containing the list of available actions, in this case containing just the one item.
Either way, if you make the connection and save the .xib file (![]() S
S
Go back to the top of this page
Go back to start of this article