
Brian Long Consultancy & Training Services
Ltd.
March 2011
Accompanying source files available through this
download link
If you run any of your applications in the iPad Simulator they won’t look like they fit in very well as all our windows and views have been hardcoded to fit to a resolution of 320x480. If you want an application to run on the iPad then you really ought to design it for the iPad and the various features it offers, not least of which the 1024x768 screen resolution.
If you start with the iPad Window-based project then your UI will be sized sensibly. The Universal Window-based project covers both options by having two nib files, one for the iPhone resolution and one for the iPad resolution. However you choose to go, there is support for the iPad.
If iPad is a valid target for your application you should also explore the various project options available (right-click on your project in the Solution window and choose Options), especially on the iPhone Build and iPhone Application pages.
I won't be going into the specifics of iPad programming in this article but it’s safe to say that all the techniques we’ve looked at thus far are perfectly applicable to programming an iPad application. However with regard to launch screens there are various different files required to cater for the different orientations the iPad application may be started in. You can find full details in this blog post.
There are three places that an icon is used in iOS: the Home screen, the Settings screen and the Spotlight (search) screen. Each of these places may require an icon of different dimensions. Depending on what devices you are targeting you may have to consider additional dimensions of each image again as iPhone 3 and iPod Touch use one set of resolutions, iPhone 4 uses another and iPad uses yet another.
In the simple case of targeting iPhone 3 and iPod Touch you would include two image files for these icons. Icon.png (57x57) is used on the Home screen and Icon-Small.png (29x29) is used on the Settings screen and also on the Spotlight screen.
If you were building a Universal application targeting all iOS devices then you would need to include all these icon files:
| File name | Image dimensions | Purpose |
| Icon.png | 57x57 | iPhone/iPod Touch Home screen |
| Icon@2x.png | 114x114 | iPhone 4 Home screen |
| Icon-72.png | 72x72 | iPad Home screen |
| Icon-Small.png | 29x29 | iPhone/iPod Touch Spotlight and Settings, iPad settings |
| Icon-Small@2x.png | 58x58 | iPhone 4 Spotlight and Settings |
| Icon-Small-50.png | 50x50 | iPad Spotlight |
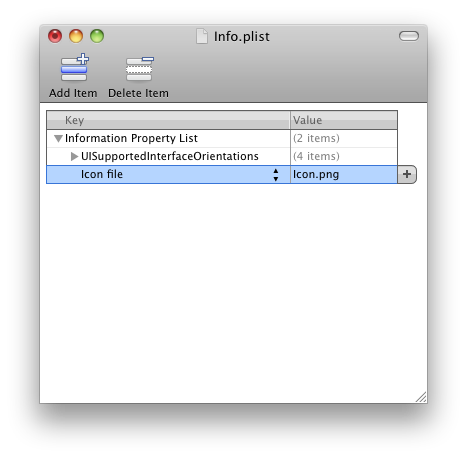
Unlike the launch screen image these icons are not automatically used by iOS. Instead you have to specify the root file name in an entry in your project’s Info.plist file. This is an XML Information Property List file processed by iOS to set things up correctly for your application. Double-clicking on Info.plist invokes the property list editor. By default you’ll see the file has very little in it. You must add in a new entry in using the Add Child button (or Add Item button, depending on what is selected). The new entry (the key) should be Icon file (this can be selected from the drop down list) and the value should be the root icon file name as shown below.

The web services example contains the iPhone and iPhone 4 icons and also has a customized display name on the Home screen thanks to one of the project options. On the iPhone Application page of the options, the Display Name value in the Application Bundle section controls what text is written under the icon on the Home screen.
![]()
![]()
When running MonoTouch applications in the iOS Simulator from MonoDevelop you have access to a very capable debugger in the MonoDevelop IDE. It has the usual features of breakpoints, stepping into calls, stepping over calls, watches, local variables, call stack, thread information etc. All that is needed is some time to get used to where the windows and controls are and what shortcuts are available.
Some important things to note, however, include the fact that when debugging an application it takes up much more space than a release version and will be much slower due to the way debugging is implemented.
Additionally you need to take care when trying to debug code that executes during
the application startup process, for example in your main view controller’s ViewDidLoad()
method or the App Delegate’s FinishedLaunching() method. iOS keeps
an eye on an application as it starts and checks to see it makes it past startup
to be usable by the user in a timely fashion. If it gets held up in the startup
process for more than 10-20 seconds iOS will assume the application has hung and
so will kill it. So if you place a breakpoint in one of those startup methods, you
get very little time to debug anything before the application is removed before
your very eyes.
To debug code in the main view’s startup methods, consider making it a secondary
view launched from a button on a temporary main view. Alternatively use the very
common process of logging information to the Application Output window in order
to track down your bug. Calls to Console.WriteLine() get listed in
the MonoDevelop Application Output window and this proves to be a very handy tracking
mechanism.
Go back to the top of this page
Go back to start of this article