
The Delphi/C++Builder IDEs have the occasional feature which is not made available to the general public. Many of these are enabled using registry entries but sometimes you have to write some code to do the job.
If you find useful information in these articles please consider making a donation. It will be appreciated however big or small it might be and will encourage Brian to continue looking for undocumented features in future Borland products.
Various versions of Delphi include menu items which, for one reason or another, are left hidden. Usually this is because the feature has not been fully tested, or has known issues. However, assuming you are willing to work within these boundaries you can write some simple code in a package and make these menu items visible.
The following unit shows the basic template required to show a hidden menu item on Delphi's main window. To make the menu item visible, substitute the name of the menu item component in place of MenuItemName, then add the unit to a package and install it. The package can either be a new one created with the File | New... or File | New | Other... menu, or an existing package, such as the Borland user package (called dclusr.dpk in Delphi 6 and found in Delphi's lib directory). To install the package, simply press the Install button on the package editor's toolbar. Add the unit to a package
unit EnableGoodies;

interface

procedure Register;

implementation

uses
  Classes, Forms, Menus;

procedure Register;
var
  Comp: TComponent;
begin
  //Make a hidden menu item visible
  Comp := Application.MainForm.FindComponent('MenuItemName');
  if Comp is TMenuItem then
    TMenuItem(Comp).Visible := True;
end;

end.
The following sections describe some of the hidden menus available, including what the menu item component names are. Make a unit based on the template above and include the relevant statements as many times as are necessary, substituting the menu item name in, install the unit in a package and the menu items will become visible.
This is exactly the same as it is in Delphi 6, however when the menu item is made visible it does not appear on the menu. You can overcome this by assigning a unique shortcut to its ShortCut property, as in:
uses
  Windows;
...
procedure Register;
var
  Comp: TComponent;
begin
  Comp := Application.MainForm.FindComponent('RunRunNoDebugItem');
  if Comp is TMenuItem then
    with TMenuItem(Comp) do
    begin
      Visible := True;
      ShortCut := Menus.ShortCut(VK_F9, [ssShift]); //Assign Shift+F9 as the shortcut key for this item
    end
end;
You can now use Shift+F9 (or whatever shortcut you assigned) to run your application with debugging disabled
This is exactly the same as it is in Delphi 6.
This is exactly the same as it is in Delphi 6.
This is exactly the same as it is in Delphi 6.
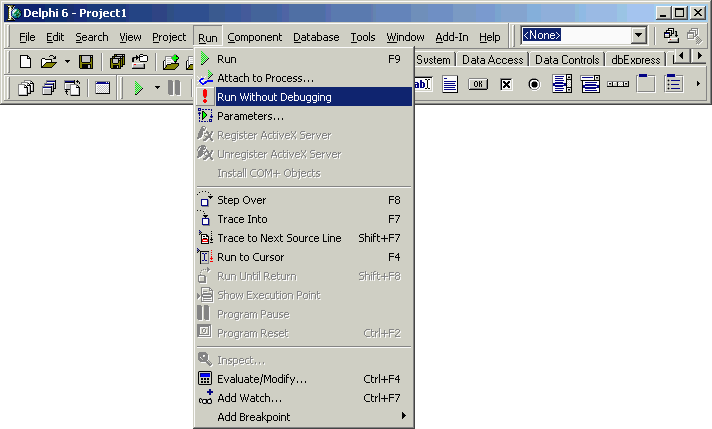
Normally you run applications from the IDE with F9. This launches it taking into account the state of the integrated debugger which, by default, is enabled. Occasionally you need to test the application's behaviour when running outside the debugger's control. This involves either locating the .EXE file in Windows Explorer and launching it from there, or disabling the integrated debugger, launching with F9, then re-enabling the debugger. Similarly, there are times when you have many breakpoints set up across your application and you want the program to run straight through for a change, without breaking on any breakpoints. Again, you must either disable the debugger in the pertinent dialog or run from Explorer.
A simple alternative solution is to use the new Run Without Debugging menu item, whose name is RunRunNoDebugItem.

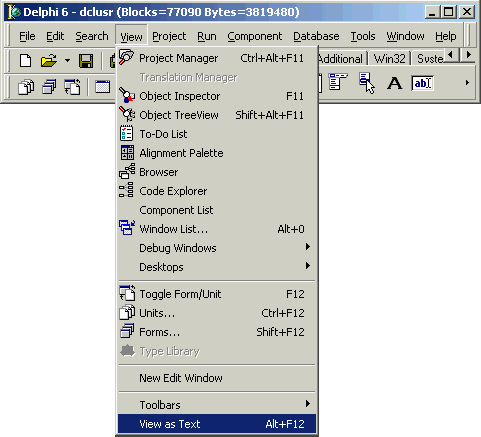
Delphi supports displaying a form in the visual Form Designer and also textually in the code editor. The Alt+F12 code toggles between the two but there is a menu item that does the same thing. This menu item is called ViewSwapSourceFormItem.
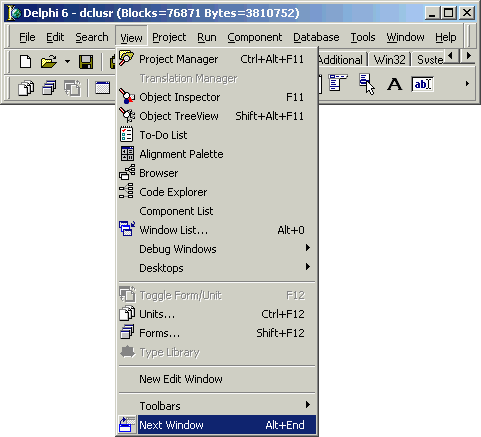
Delphi 6 supports the Alt+End shortcut that takes you to the next availble window in the IDE. The hidden menu item ViewNextWindowItem does the same thing.
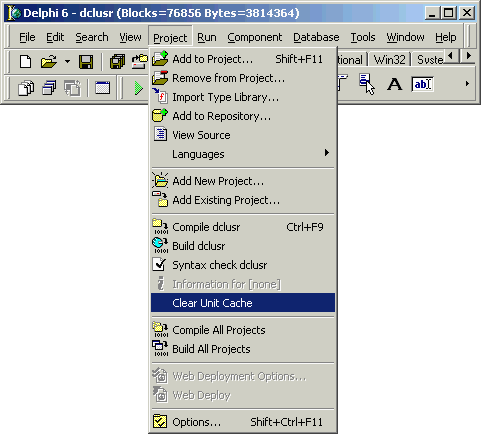
When you change the VCL source you sometimes find the IDE will not notice because it holds a cache of recently compiled units. The hidden ProjectClearUnitCacheItem menu item allows you to dump the cache allowing these changes to take effect.
The Component Palette displays its tab above the component images by default. A hidden Orientation submenu on its context menu (the menu you get by right-clicking on it) lets you specify if the tabs should be at the bottom or top. This menu item is called PaletteOrientItem.

This submenu has two items visible on it by default, Top and Bottom. There are two other hidden menu items that you can display that allow you to specify the tabs should be drawn on the left (PaletteLeftItem) or the right (PaletteRightItem).

However, since the Component Palette is quite short these two items don't have a very positive effect. Indeed, once a tab control has had its TabPosition property set to tpLeft or tpRight, the MultiLine property is automatically set to True. This might sound like a good idea (many people desire a multiline Component Palette) but it really doesn't do the job. You do get multiple lines of tabs but the Component Palette itself does not change its height, so you lose a good portion of the component images.

Normally you can only create a new unit by using the File | New... dialog, but there is a hidden menu item on the File menu (FileNewUnitItem) that will do it for you.
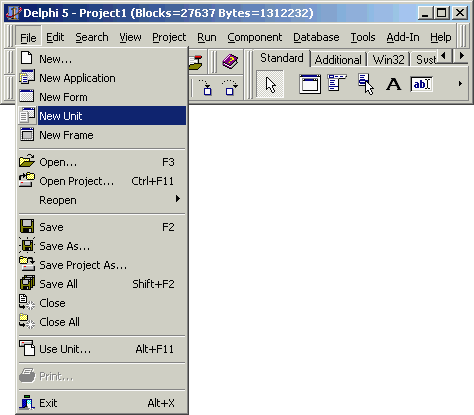
This is exactly the same as it is in Delphi 6.
This is exactly the same as it is in Delphi 6.
This is exactly the same as it is in Delphi 6.
During development of Delphi 7 an improvement to the editor window was considered, which involved embedding a new, small toolbar into one of the status panels in the status bar. The toolbar would have three buttons that surface the keystroke macro recording capabilities onto the development environment's UI. However, before release the Borland engineers changed their mind, so the toolbar doesn't show in the default Delphi 7 setup. It does, however, get used in Delphi 8 for .NET.
If you wish to use it you can make it show up, since it does exist but in a hidden state. A unit like the one listed below, added to a design-time package will make the keystroke macro toolbar show up in the first status panel in the editor status bar (which is otherwise unused).
unit D7EditorTweak;

interface

procedure Register;

implementation

uses
  SysUtils, Forms, ComCtrls;

procedure Register;
var
  I: Integer;
  ToolBar: TToolBar;
begin
  for I := 0 to Screen.FormCount - 1 do
    if CompareText(Screen.Forms[I].ClassName, 'TEditWindow') = 0 then
    begin
      ToolBar := Screen.Forms[I].FindComponent('RecordToolBar') as TToolBar;
      if Assigned(ToolBar) then
        ToolBar.Visible := True
    end
end;

end.
The toolbar can be seen here:
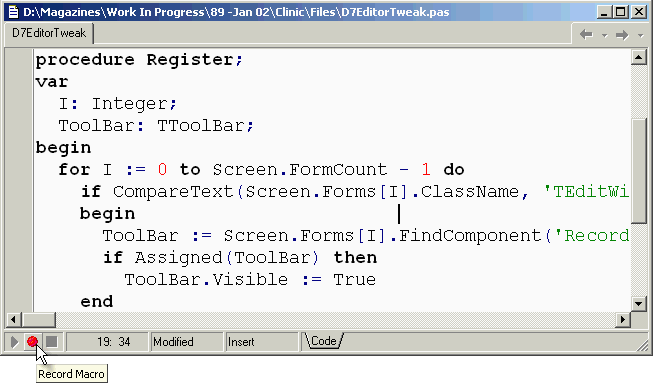
Alternatively you can use an undocumented registry entry to get the same effect permanently.
Go back to the top of this page
Go back to the Undocumented Features page