
Deep sea fishing in Delphi
(VCL secrets and the practical use of the Win32 API)
If you find this article useful then please consider making a donation. It will be appreciated however big or small it might be and will encourage Brian to continue researching and writing about interesting subjects in the future.
Delphi provides a happy home for many developers. Using the components on the component palette, along with a useful set of routines, people get by quite happily with the product. Home sweet home.
But do you just want to get by? Or do you want to stride forward, using Delphi as a weapon to battle against a variety of programming problems?
If you are of the mindset to say yes to this question, then this training session is for you.
Here we will look beyond the well known components and objects in the Visual Component Library (VCL), looking into the depths of the Run-Time Library (RTL). There we will find unseen treasures, a huge amount of functionality going to waste. Without resorting to a heap of third-party add-ons you can attack a horde of programming problems with a full armoury.
As well as looking at what often goes unused in Delphi, we will also turn our attention to the Windows API. Many a task can be accomplished using appropriate APIs (in fact Windows applications only function because they are calling many Windows APIs already).
We will consider a number of common and not so common problems that can be solved by prudent API programming. Some of the common problems include allowing the user to choose a folder and finding the user name of the logged in user. The less common problems will include locating an arbitrary window in the Windows system by iterating across every window that exists.
There are a number of guidelines which need to be followed when trying to tackle the Windows API, which we will identify and follow in order to solve the problems.
Click here to download the files associated with this paper.
When dynamically loading DLLs, it is common to use LoadLibrary. This asks Windows to try and locate the named DLL in a variety of places. These are the application’s directory, the current directory, the System directory, the Windows directory and the search path (as defined by the PATH environment variable).
If the DLL cannot be found, Windows may choose to display an unpleasant dialog acknowledging its failure. You can code around this problem using the SetErrorMode API, but the new SafeLoadLibrary routine does this for you. SafeLoadLibrary was added to Delphi 5 for two reasons.
One was to avoid having to call SetErrorMode (it calls it for you) when calling LoadLibrary. The other is to preserve the floating-point co-processor control word, which can be "damaged" by some DLLs on loading (particularly some Microsoft DLLs).
ColorToString and StringToColor
Windows colours are just numbers. They have a byte for the red level, a byte for green and a byte for blue. With eight bits to a byte, this allows for 24-bit colour values. There are also a couple of extra bits in a colour value that can have special meanings.
When displaying an arbitrary colour number in textual form, it is common to simply translate it into its hexadecimal representation, for example using:
Format('The colour value is %x', [Color])
However, Delphi defines a number of colour constants and it may be more appropriate to make use of these where you can. To help out, you can use the ColorToString translation function which will return a colour constant if possible. so you can write:
Format('The colour value is %s', [ColorToString(Color)])
There is also a corresponding StringToColor function that translates the other way. These routines are in all versions of Delphi.
If you write database applications that use the BDE, there is a possibility that you may need to call BDE API routines from time to time. These are referred to as IDAPI routines, where IDAPI is an acronym for the Integrated Database API. These routines all return a BDE error code in the form of a DBIResult. Code should check whether the returned value equals DbiErr_None (0) before proceeding. Any other value typically indicates an error.
To keep BDE API usage consistent with VCL programming, where exceptions occur to represent an error, you can pass all BDE return codes straight through to the Check routine. Check takes a DBIResult and generates an EDBEngineError if it is non-zero.
Alternatively, you can do the comparison yourself, and if you wish to raise an exception to represent the BDE error code, pass the code to the DbiError procedure.
Check and DbiError have been in the VCL since Delphi 1.
Win32Check and RaiseLastWin32Error
The Win32 API also has a consistent return value pattern, a little like the BDE. Instead of directly returning error codes, most Win32 APIs return True (or non-zero) or False (or zero) values indicating success or failure. If an API returns False, you are normally advised to call the GetLastError API to find what the actual error code is.
Again, for consistency with the exception model employed by the VCL, you can pass the result of a suitable Win32 API directly into Win32Check. If the value is False, it will raise an EWin32Error exception to represent the error, after calling GetLastError for you and then asking Windows for a textual description of the returned error. Alternatively, if you wish to do the comparison yourself, you can call RaiseLastWin32Error to turn the last Win32 API generated error into an exception.
These two routines were introduced in Delphi 3.
OleCheck, Succeeded and Failed
COM routines typically return HResult values. These are 32-bit numbers where the high bit represents success or failure and the other bits are used to describe the situation reported by the COM routine.
The Succeeded and Failed functions come from Windows and provide an easy mechanism to identify whether a HResult indicates if a COM routine worked or not. To fit in with the exception model, you can alternatively pass the HResult to the OleCheck procedure. If the HResult indicates failure, an EOleSysError exception is raised describing the error.
OleCheck was defined in Delphi 2’s OleAuto unit and from Delphi 3 onwards can be found in the ComObj unit.
Boolean arrays versus sets versus TBits
When you need to record many pieces of Boolean data, Delphi offers several choices. The most obvious is an array of Boolean elements, be it one whose size is pre-determined or a dynamic array (in Delphi 4 or later).
This works just fine (see Listing 1) but is quite expensive in terms of storage as each element will take one byte, even though a Boolean value should really only need one bit. That makes seven wasted bits (almost a whole byte) for each Boolean stored.
Listing 1: Using a dynamic Boolean array
var
  Flags: array of Boolean;
...
  //Make flags array big enough for eight Boolean flags
  SetLength(Flags, 8);
  //Fill array with False
  FillChar(
    Flags[ Low( Flags ) ],
    Succ( High( Flags ) - Low( Flags ) ) * SizeOf( Boolean ),
    False);
  //Set some flags
  Flags[1] := True;
  Flags[3] := True;
end;
An equivalent storage mechanism can be attained using a set. Let’s follow the idea through to understand it properly.
Set types are commonly defined in terms of enumerated types. For example the BorderIcons property is defined as type TBorderIcons, which is defined as a set of TBorderIcon values (see Listing 2). This means that each TBorderIcon value can optionally be in or out of this type of set.
Listing 2: An example of a set as described in the help
type
  TBorderIcon = (biSystemMenu, biMinimize, biMaximize, biHelp);
  TBorderIcons = set of TBorderIcon;
...
property BorderIcons: TBorderIcons;
To implement this, the set is stored as an array of bits, one for each value in the TBorderIcon type. If the bit is set, the value is in the set, otherwise the value is not in the set.
Whilst enumerated types are most common for sets, any ordinal type can be used, where the ordinality (the numeric representation) of the largest value in the type is less than 256. This means you can have a set of characters (set of Char) or a set of bytes (set of Byte).
You do not necessarily have to define a set type in advance. You can simply construct the set as needed using standard Pascal set notation if you wish, and the compiler will be perfectly happy. For example ['a', 'c'..'e'] represents a set of four characters.
Listing 1 showed some code that set up an array of flags where flags 1 and 3 (the second and fourth flag) were set to True. You can do the same thing using a set using the code in Listing 3. Notice there is a commented version that shows a step-by-step equivalent to Listing 1. To allow more flexibility in extending the number of flags used, you could redefine TFlagValues as set of Byte.
Listing 3: Using a set to hold a number of flags.
type
  TFlagValue = 0..7;
  TFlagValues = set of TFlagValue;
var
  Flags: TFlagValues;
...
//Flags := []; //Clear all flags
//Include( Flags, 1 ); //Set some flags, individually
//Include( Flags, 3 );
Flags := [1, 3]; //Set state of all flags at once
Sometimes even the flexibility of a set does not cut it. When you need to maintain a number of bit settings, potentially numbering more than 256 you can use a TBits object. TBits represents an extendible array of bits, where each element only takes the single bit required to hold its value.
The only properties it offers are Bits, which is the default array property that gives access to the bits, and Size, which allows you to specify the size of the array (and read it back). Listing 4 shows a TBits object in use.
Listing 4: Using a TBits object to represent some flags
var
Bits: TBits;
...
Bits := TBits.Create;
Bits.Size := 8;
...
Bits[1] := True;
Bits[3] := True;
...
Bits.Free;
You can use the bits in a TBits array to represent anything you like, but it is quite common to use them to indicate filled slots in an array or list. A bit set to True indicates an occupied slot, and a bit set to False represents a free slot. To help in these scenarios, there is an OpenBit method which returns the position of the first bit with a False value.
TBits was defined in Delphi 2. Delphi 1 had an equivalent class called TBitPool.
Delphi 4 introduced actions into the VCL and as a consequence many Delphi developers are implementing the user-driven functionality of their applications using actions. This is wise, as actions effectively look after themselves and the UI controls connected to them. As properties change in an action, these changes automatically propagate to the connected controls. So if an action is disabled, the connected controls (called action clients) are immediately disabled.
Actions can be set up by a developer within a given application (custom actions) or can be pre-defined (standard actions). Delphi comes with a library of standard actions that seems to be growing with each release of the product.
One standard action that has not been documented is THintAction. The VCL creates a THintAction to represent a component’s Hint property (typically displayed as a tooltip) as soon as you move your mouse over a control. The only in-built purpose for the hint action is to allow a special property of the TStatusBar class to do its job.
In case you haven’t noticed it before, the TStatusBar class defines an AutoHint property. This makes the status bar display component hint information on itself automatically. You set AutoHint to True and make sure that either SimplePanel is set to True, or that you use the Panels property editor to set up some sub-panels (TStatusPanel objects).
The only caveat to this is that THintAction objects are only created if you have not set up an OnHint event handler for the Application object (or a TApplicationEvents component, introduced in Delphi 5).
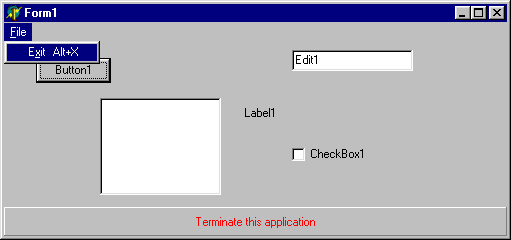
All the above is fine if you want to use a status bar, but is not so handy if you want component hints displayed in a custom panel, for example, as shown in Figure 1. Then you have to resort to the aforementioned OnHint event. Or do you?
Figure 1: Custom hints without an OnHint event handler

In truth, you can explicitly use the THintAction action object by hooking into the broadcast mechanism used to find a component that can use this action. The easiest approach is to override the form’s ExecuteAction method and read the hint action’s Hint property from there as shown in Listing 5. This code can be found in the AutoHints.dpr Delphi 4 (and later) project.
Listing 5: Personal THintAction Processing
uses
  StdActns;
...
type
  TForm1 = class(TForm)
    ...
    pnlHintDisplay: TPanel;
  public
    function ExecuteAction(Action: TBasicAction): Boolean; override;
  end;
...
function TForm1.ExecuteAction(Action: TBasicAction): Boolean;
begin
  Result := False;
  if Action is THintAction then
  begin
    Result := True;
    pnlHintDisplay.Caption := THintAction(Action).Hint
  end
end;
Locating objects of a given type
This procedural variable has been defined in the Classes unit since Delphi 2. It is used by the streaming system to locate top-level components when linked forms are loaded.
For example, say a TDBGrid on a form refers to a datasource object on a data module. At design-time, you make sure the form unit uses the data module unit, and you can use the DataSource property editor’s drop-down list to choose DataModule1.DataSource1 (or whatever). When the form is loaded, the streaming system calls FindGlobalComponent to locate DataModule1. If it cannot be located straight away, the streaming system tries again after each additional form or data module is loaded until it is (hopefully) found.
FindGlobalComponent is itself a procedural variable. The Classes unit is not responsible for working out how to locate the target components. It relies on some other useful unit to make the variable refer to a suitable routine. The Forms unit takes the job on and assigns its own private FindGlobalComponent procedure to the FindGlobalComponent variable.
The implementation of the routine loops through the available forms and data modules, using Screen.Forms, Screen.FormCount, Screen.DataModules and Screen.DataModuleCount looking for one with a Name that matches the string passed along to it. If it finds one it returns a reference to it, otherwise it returns nil. Consequently, the variable could have been more accurately named FindGlobalTopLevelComponent.
To make this potentially useful routine more useful, you could write your own routine that does a more thorough job of looking for a component. This could also iterate through the owned components of the forms and data modules, thereby turning it into general purpose component locator. However, you would then need to ensure all your components had unique Name property values to ensure the right component was found.
Another mechanism that is almost available for use is partially defined in the Pascal include file (a .INC file) that implements the RTL memory manager. GetMem.Inc is included by the System unit (System.pas) in the Source\RTL subdirectory. This solution exists in Delphi 5 and will presumably continue with later versions.
Right at the end of this 1500 line (approximately) file is a whole chunk of debugging code that is never compiled into your code thanks to some conditional compilation. Even if it were compiled in, you would not be able to use the routines under normal circumstances as their declarations and the data types they use are not in the System unit interface section. At least, not in the version of the unit that you get with the commercial product.
If you scroll down through the System unit starting at the top, you will find a collection of blank lines. These represent where the declarations appear in the internal version of this source file. Again, they would be wrapped in a conditional compilation block. I suspect these lines are stripped to keep people from re-compiling the System unit, a practice that Inprise tries to persuade you against doing. The System unit is very sensitive to changes as the compiler has a special relationship with its content.
However, so long as we do not add any additional custom routines of our own into the unit, I see no problem with inserting the missing lines back in, defining the conditional symbol, and using the Inprise-supplied make file to rebuild the whole RTL, System unit and all.
The block of debugging code in GetMem.Inc boils down to the two general-purpose routines shown in Listing 6.
Listing 6: The missing debugging helper declarations from the System unit
{$DEFINE DEBUG_FUNCTIONS}
{$IFDEF DEBUG_FUNCTIONS}
type
  THeapBlock = record
    Start: Pointer;
    Size: Integer;
  end;

  THeapBlockArray = array of THeapBlock;
  TObjectArray = array of TObject;

function GetHeapBlocks: THeapBlockArray;
function FindObjects(AClass: TClass; FindDerived: Boolean): TObjectArray;
{$ENDIF}
GetHeapBlocks will return a THeapBlockArray filled with THeapBlock records describing every block of memory being managed by the Delphi memory manager. I haven’t really found much of a use for this as yet.
On the other hand, FindObjects can be very useful. Its implementation scans every single heap block looking for blocks that appear to contain objects. You pass a class reference to FindObjects and also a Boolean flag called FindDerived. The TObjectArray returned by this routine contains every Delphi object of the specified type and if FindDerived is True, also of any inherited types.
For example, suppose you want quick access to every TButton object in your application, but not anything inherited from TButton, such as TBitBtn objects. You can achieve this by declaring a TObjectArray variable and assigning the return value of this function call to it:
FindObjects(TButton, False);
The array will contain every TButton, regardless of whether they are visible, invisible, enabled, disabled, with or without a parent, owned or ownerless. More dramatically, this call will return an array of every object existing in your application:
FindObjects(TObject, True);
The great thing about the array types is that they are defined as dynamic arrays. You do not need to guess how large to make them and you also needn’t worry about freeing their memory. Delphi ensures dynamic arrays are freed up at appropriate points.
If these routines look like they would be useful, you will want to know what changes to make and how to successfully recompile the RTL, and then compile the changed units into your application. Let’s take it step by step, but note that you will need Turbo Assembler 4.0 or later to do the job. If you do not have a copy of Turbo Assembler, this is a good excuse to go and buy it.
Another important note is that Turbo Assembler 4.0 and 5.0 both have patches available to them which should be applied. The Turbo Assembler 4.0 patch can be found at ftp://ftp.inprise.com/pub/borlandcpp/devsupport/patches/tasm/ta4p01.zip, and the program that applies the patch is at ftp://ftp.inprise.com/pub/borlandcpp/devsupport/patches/bc5/patch.zip. If that patch program crashes when run under NT (and only if this is so) an alternative version can be found ftp://ftp.inprise.com/pub/borlandcpp/devsupport/patches/bc5/patch-nt.zip.
The Turbo Assembler 5.0 patch is at http://info.borland.com/devsupport/borlandcpp/patches/TASMPT.ZIP.
To test how things work, make a new project and change the Search Path (in the Directories\Conditionals page of the project options dialog) to start with $(DELPHI)\Source\RTL\Lib. Now add a handful of buttons on the form and add the code from Listing 7 into the form’s OnCreate event handler.
Listing 7: Testing the FindObjects routine
procedure TForm1.FormCreate(Sender: TObject);
var
  Buttons: TObjectArray;
  Loop: Integer;
begin
  Buttons := FindObjects(TButton, False);
  for Loop := Low(Buttons) to High(Buttons) do
    TButton(Buttons[Loop]).Caption := Format('Found %d', [Loop])
end;
Figure 2: Several buttons having been located through the memory manager

If you want to keep these routines around for general use without changing the search path, that is not a problem. Firstly compile the RTL without debug info and copy the generated DCU files from Delphi’s Source\RTL\Lib directory into Lib. Then recompile with debug info and copy the DCUs from Source\RTL\Lib into Lib\Debug.
In an application that is implemented using actions throughout (the Delphi IDE is such an example) you can take advantage of the action architecture to perform certain tasks. This will only apply to Delphi 4 and later as actions did not exist in earlier versions.
For example, all actions are filtered through the Application object’s OnExecuteAction event before they get executed. This allows you to globally examine any action and do with it what you want. For example you can keep track of all the actions invoked by a user.
This might be done to perform some form of analysis as to the more common application functionality accessed by the users, or just to keep an eye on what goes on generally. Sometimes, for tracing reported faults, having an idea as to what the user has been doing in a given program session can be useful.
You can either make an OnExecuteAction event handler for the Application object programmatically, or use the ApplicationEvents component instead, introduced in Delphi 5. The latter is much easier as it involves no coding. An OnExecuteAction event handler can be made for a TApplicationEvents component using the Object Inspector.
An example event handler is shown in Listing 8, which can be found in the ActionLogger.dpr Delphi 5 (and later) project. Notice that it avoids tracing the THintAction standard action, since these crop up very regularly as the user moves the mouse around your application’s forms.
Listing 8: Logging all actions executed in an application
procedure TForm1.ApplicationEventsActionExecute(Action: TBasicAction;
  var Handled: Boolean);
var
  ActionLogFile: TextFile;
  ActionLogFileName: String;
begin
  //Ignore THintActions
  if Action is THintAction then
    Exit;
  //Make log file name same as EXE but ending in LOG
  ActionLogFileName := Application.ExeName;
  Delete(ActionLogFileName, Length(ActionLogFileName) - 2, 3);
  ActionLogFileName := ActionLogFileName + 'LOG';
  //Open the file, either by creating or appending
  AssignFile(ActionLogFile, ActionLogFileName);
  if FileExists(ActionLogFileName) then
    Append(ActionLogFile)
  else
    Rewrite(ActionLogFile);
  try
    //Write details to log file
    WriteLn(ActionLogFile, Action.Name, ': ',
            Action.ClassName, ' ', DateTimeToStr(Now));
  finally
    CloseFile(ActionLogFile)
  end
end;
Tracking memory allocations
The Delphi IDE offers a heap monitor facility whereby information about outstanding heap allocations is presented on the main window’s caption bar. Whilst the IDE uses a fairly involved mechanism to get an accurate report of heap size changes as they occur, we can get much the same effect with little effort.
The IDE presents its information when you start it with a /HM or –HM command-line switch. It displays the number of blocks of memory that are currently allocated along with their cumulative size. This information can be gleaned in any Delphi application at any point with the AllocMemCount and AllocMemSize System unit variables.
To get much the same effect, you can check for the appropriate command-line parameter and, when needed, use a timer. The timer’s event handler will write the values of these two variables on the main form’s caption bar.
Listing 9 shows a self-contained unit that can be added to any uses clause in your project and will do the job for you. The FindCmdLineSwitch function (introduced in Delphi 4) is used to check for the appropriate parameter and if found, it creates an object that manages an appropriate timer.
Listing 9: A heap monitor similar to that offered in the Delphi IDE
unit HeapMonitorTimer;

interface

implementation

uses
  SysUtils, ExtCtrls, Forms;

type
  THeapMonitor = class(TObject)
  public
    Timer: TTimer;
    constructor Create;
    procedure TimerTick(Sender: TObject);
  end;

constructor THeapMonitor.Create;
begin
  inherited;
  Timer := TTimer.Create(Application);
  Timer.Interval := 100;
  Timer.OnTimer := TimerTick;
end;

procedure THeapMonitor.TimerTick(Sender: TObject);
begin
  if Assigned(Application) and Assigned(Application.MainForm) then
    Application.MainForm.Caption := Format('%s [Blocks=%d Bytes=%d]',
      [Application.Title, AllocMemCount, AllocMemSize])
end;

var
  HeapMonitor: THeapMonitor = nil;

initialization
  if FindCmdLineSwitch('HM', ['-','/'], True) then
    HeapMonitor := THeapMonitor.Create
finalization
  HeapMonitor.Free
end.
The HeapTrack1.dpr Delphi 4 (and later) project uses this unit to show the idea. It has buttons to create edit controls and destroy them so you can see memory allocations and de-allocations occurring (see Figure 3). You can use the project in Delphi 2 or 3 if you add in an implementation of FindCmdLineSwitch, or remove the call to it.
Figure 3: A heap usage monitor
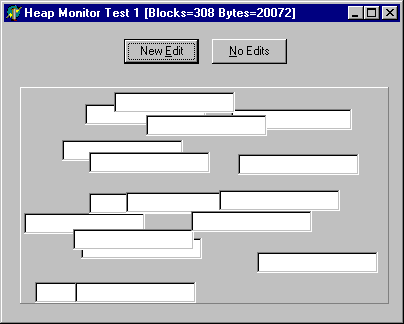
The idea of code such as this is to give you a general idea of the trend in memory consumption. If the values continue to spiral upward for no obvious reason, then maybe you have a memory leak somewhere.
An alternative plan would be to write a simple replacement memory manager that could be installed. The Delphi RTL caters for writing alternative memory managers that can be plugged in.
In most cases, plug-in memory managers will do some simple operation and then chain onto the original memory manager. Common operations would involve tracking each memory allocation. Heap leak detectors commonly use this approach to keep an eye on allocations that are not freed.
Note that it is essential to ensure you do not do anything inside the replacement heap manager that will cause another Delphi-based memory management operation, such as manipulating Delphi strings. This will lead to recursion and ultimately to page faults or stack faults. If your code does this, you must use some form of protection to avoid recursion.
Listing 10 shows a new memory manager being installed. Notice that the memory manager is defined in terms of a memory allocator, deallocator and reallocator. The System unit defined the GetMemoryManager and SetMemoryManager procedures that allow you to record and replace the current memory manager at any time.
Listing 10: A replacement memory manager that monitors heap usage
unit HeapMonitorMemMgr;

interface

uses
  Forms;

var
  HeapMonitorMemCount: Integer = 0;
  HeapMonitorMemSize: Integer = 0;

procedure UpdateDisplay;

implementation

uses
  SysUtils;

procedure UpdateDisplay;
begin
  if Assigned(Application) and Assigned(Application.MainForm) then
  begin
    Application.MainForm.Caption := Format('%s [Blocks=%d Bytes=%d]',
      [Application.Title, HeapMonitorMemCount, HeapMonitorMemSize]);
  end;
end;

var
  RTLMemoryManager: TMemoryManager = ();

function HeapBlockSize(P: Pointer): Integer;
var
  HeapPrefixDWordAddress: Integer;
begin
  //Access heap block prefix info, which includes block size and flags
  HeapPrefixDWordAddress := Integer(P) - 4;
  //Strip low 2 bits off as they are used as flags
  Result := Integer(Pointer(HeapPrefixDWordAddress)^) and not 3;
end;

function HeapMonitorGetMem(Size: Integer): Pointer;
begin
  Result := RTLMemoryManager.GetMem(Size);
  Inc(HeapMonitorMemCount);
  Inc(HeapMonitorMemSize, HeapBlockSize(Result))
end;

function HeapMonitorFreeMem(P: Pointer): Integer;
begin
  Dec(HeapMonitorMemSize, HeapBlockSize(P));
  Dec(HeapMonitorMemCount);
  Result := RTLMemoryManager.FreeMem(P)
end;

function HeapMonitorReallocMem(P: Pointer; Size: Integer): Pointer;
begin
  Dec(HeapMonitorMemSize, HeapBlockSize(P));
  Result := RTLMemoryManager.ReallocMem(P, Size);
  Inc(HeapMonitorMemSize, HeapBlockSize(Result))
end;

const
  HeapMonitorMemoryManager: TMemoryManager = (
    GetMem: HeapMonitorGetMem;
    FreeMem: HeapMonitorFreeMem;
    ReallocMem: HeapMonitorReallocMem);

initialization
  if FindCmdLineSwitch('HM', ['-','/'], True) then
  begin
    GetMemoryManager(RTLMemoryManager);
    SetMemoryManager(HeapMonitorMemoryManager);
  end
end.
The HeapBlockSize function is necessary to determine the size of any block in the Delphi sub-allocated heap. Delphi prefixes all allocated blocks with 4 bytes that contain the block size as well as two flags in the lowest two bits. To obtain the actual block size, these two bits must be masked off.
The UpdateDisplay procedure can be called from a timer or from the Application object’s OnIdle event handler as you like (or the OnIdle event handler of a TApplicationEvents component). A simple Delphi 5 (and later) project HeapTrack2.dpr (much like HeapTrack1.dpr) shows this unit in use. Again, you must pass the /HM or –HM command-line switch to invoke the heap monitoring.
You can use the project in Delphi 4 if you set the Application object’s OnIdle event to refer to the ApplicationEventsIdle method.
Achieving Goals With The Win32 API
To find information about Win32 API programming using only the facilities provided involves using the Windows SDK help files. However, these help files are written by Microsoft for C programmers, and so all the help is in C syntax. You can access the help in a variety of ways.
API help from the Delphi editor
If you wish, you can type the API name into your Delphi editor window and press F1. The context-sensitive help in the editor will look not only through the Delphi help, but also through the SDK help.
Alternatively, you can invoke the SDK help by using one of the options installed in your Delphi Start menu folder. From within the Delphi group in the Start menu, choose Help, then MS SDK Help Files, then Win32 SDK Reference.
Delphi 5 introduced a menu item that will launch the Windows SDK Reference help file on the Help menu. This is much easier that some of the other options presented here.
API help from a customised toolbar
As another option, you can install one or two additional buttons onto one of the toolbars, dedicated to launching the SDK help. One will launch just the main Windows API help, whilst the other will launch the full Win32 SDK Reference (which gives access to many Win32 help files).
This process can be started by right-clicking on any of Delphi’s toolbars and choosing Customize… which takes you to the toolbar customisation dialog. Select the Commands page of the dialog and click on the Help category in the Categories: listbox. Browse through the list of commands on the right hand side and you will see a Windows API command along with a Windows SDK command (see Figure 4).
Figure 4: Customising the Delphi toolbars to include Windows SDK help
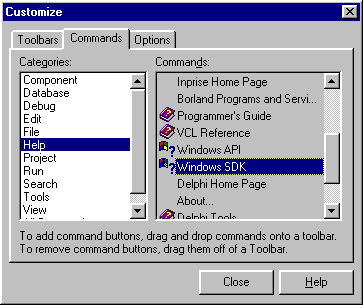
You need to drag either of these commands (or both) from the Commands: listbox on to the toolbar where you want it/them to reside. Figure 5 shows of one of the toolbars which has been undocked from the main IDE window. This particular toolbar normally has just the default Help button on it. It has had some clipboard buttons, the Windows API button, the Windows SDK button and a separator added to it.
Figure 5: A customised IDE toolbar, with access to the Windows SDK help files

More up-to-the-minute help can be obtained from the Microsoft Developer Network (MSDN), either online on Microsoft’s Web site or from the Library CD. The MSDN contains the Platform SDK which is updated regularly.
Identifying the Delphi import unit
Once you have found an appropriate API call in the help, you will see it declared in C syntax (see Listing 11). Let’s not get too concerned over this syntax right now. Suffice it to say that this suggests the routine takes two LPCTSTR parameters for the source and destination file names, and a BOOL that indicates what to do if the target file exists (the rest of the help page describes the parameters in more detail).
Listing 11: The C declaration of a Win32 API
BOOL CopyFile(
  LPCTSTR lpExistingFileName, // pointer to name of an existing file
  LPCTSTR lpNewFileName,      // pointer to filename to copy to
  BOOL bFailIfExists          // flag for operation if file exists
);
Next, you need to identify which Delphi import unit it is defined in. To do this, start by pressing the Quick Info button in the help file. Figure 6 shows the Quick Info for the CopyFile API. It tells you that CopyFile is supported on Windows 95 (and therefore Windows 98) and Windows NT, which is good news. It also says that (for C programmers) the API information is declared in the WinBase.h header file.
Figure 6: The Windows API help for CopyFile
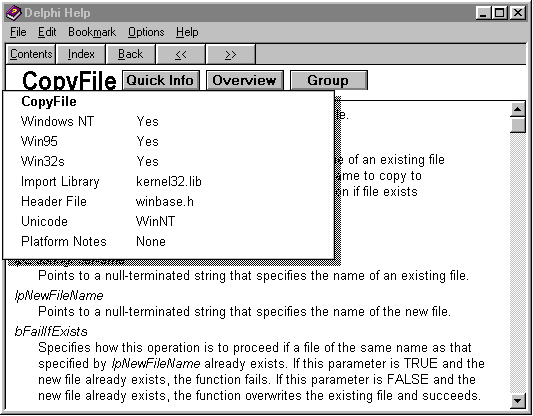
What we as Delphi programmers need to know is that generally you can work out which import unit contains the import declaration for an API by seeing which C header file declares it. If the API appears in a unit at all, the unit usually has the same name as the header file, with a few exceptions.
So if the header file was listed as shellapi.h, the import unit would be ShellAPI. If the header file was listed as mmsystem.h, the import unit would be MMSystem. The header files winreg.h, winver.h, winnetwk.h, wingdi.h, winuser.h and winbase.h (basically those in the form winXXXX.h) are dealt with by the main Windows import unit, automatically added to the uses clause of each form unit.
To see the Delphi declaration of CopyFile, open the Windows.pas unit. In Delphi 4 and later, you can click on the Windows unit in a uses clause, press Ctrl+Enter and the file will open straight away, as the relevant directory is on the browsing path. Alternatively you can hold down the Ctrl key and move the mouse to the unit name (whereupon it will turn into a hyperlink) and click on it. For Delphi 2 and 3, pressing Ctrl+Enter will shown an open dialog. You will need to navigate to Delphi’s Source\RTL\Win directory to find the unit.
Once the unit is open, do a search to find CopyFile. The declaration will look like Listing 12.
Listing 12; An import declaration for a Win32 API
function CopyFile(
  lpExistingFileName, lpNewFileName: PChar;
  bFailIfExists: BOOL): BOOL; stdcall;
The two file name parameters are declared as type PChar and the Boolean is declared as type BOOL, which equates to the Delphi type LongBool. Having clarified the situation, you can now use the API.
Typically, when API routines take string parameters, they translate into Delphi PChar types. A PChar is a pointer and obliges you to perform memory management to provide space for the API to work with. To avoid this responsibility, you can declare a zero-based Char array and pass the name of the array instead. Delphi will pass the address of the first element in the array, thereby satisfying the PChar requirement.
More complex parameter types are defined in C as structures (what we call records). The C type name will (usually) exist verbatim in Delphi 4 or later. However, all 32-bit versions of Delphi tend to offer a more Delphi-esque version of the type as well.
For example, the CreateProcess API requires two records to be passed in, a STARTUP_INFO record and a PROCESS_INFORMATION record. Whilst Delphi 4 and later define these types, all 32-bit versions of Delphi define alternative versions called TStartupInfo and TProcessInformation as well.
Note that whilst the C definition of many APIs will specify parameters as pointers to records, integers, DWords and so on, these will often be translated in the Delphi definition as var parameters. var parameters are passed by reference, so the address of the supplied variable is passed across. This has the same effect as using a pass by value pointer parameter.
When calling Win32 API routines, remember that they simply return error indicating values. They do not raise Delphi exceptions themselves. If you want to keep with the Delphi exception model, be sure to use Win32Check and RaiseLastWin32Error.
There are a number of standard Windows dialogs that do not fall under the category of common dialogs (as represented by the components on the Dialogs page of the Component Palette). These dialogs are implemented by the Windows shell and include property display, icon selector, application run, and the browsing dialog used to browse for computers and folders.
Many of these dialogs are invoked with undocumented functionality, although the browse dialog is fully documented. For more details on the undocumented APIs that can be used to access these dialogs, take a trip to James Holderness’s Undocumented Windows 95 Web site at http://www.geocities.com/SiliconValley/4942. This gives pretty full information (using the C syntax) about these APIs and typically highlights differences to be found between Windows 95 and Windows NT implementations.
Directory selection through a VCL wrapper
Delphi has had code in the VCL to invoke a shell file browsing dialog since version 4. The FileCtrl unit has two versions of the SelectDirectory function. One invokes a VCL-created dialog, one invokes the shell dialog.
The SelDir.dpr Delphi 4 (or later) project invokes both these dialogs from separate buttons. The chosen directory is written in one label, and written again in another label, but this time using another FileCtrl routine. When you need to display a path in a limited amount of space, the MinimizeName function is useful. This takes a path, the canvas it will be drawn on and a maximum pixel limit.
If the path is too long to be drawn on the canvas in the current font, portions of it are removed and replaced with three dots to compensate. It is important to remember that a label does not have its own canvas. It is drawn on its parent’s canvas, which in this case is the form’s. The directory is trimmed to be no longer than either of the buttons on the form, as you can see the lower label in Figure 7.
Figure 7: A full directory and one that fits into a space
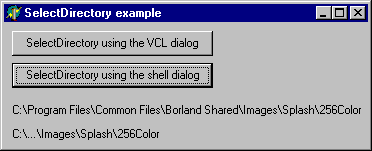
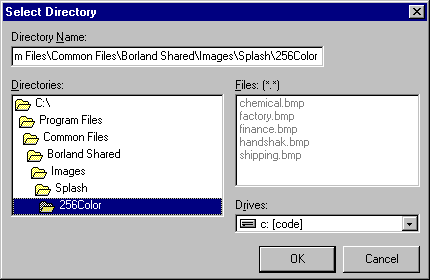
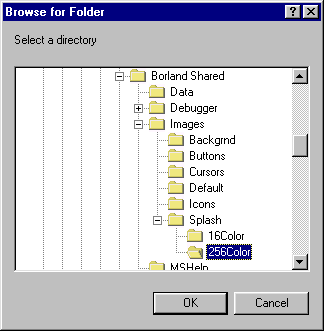
The code for the two buttons can be found in Listing 13 and Listing 14, and the dialogs can be seen in Figure 8 and Figure 9 respectively.
Listing 13: Selecting a directory using a VCL dialog
procedure TForm1.btnVCLDialogClick(Sender: TObject);
var
  Dir: String;
begin
  if SelectDirectory(Dir, [sdAllowCreate, sdPerformCreate, sdPrompt], 0) then
  begin
    lblDir.Caption := Dir;
    lblTrimDir.Caption := MinimizeName(Dir, Canvas, lblTrimDir.Width);
  end;
end;
Figure 8: The VCL directory selection dialog
Listing 14: Selecting a directory using a shell dialog
procedure TForm1.btnShellDialogClick(Sender: TObject);
var
  Dir: String;
begin
  if SelectDirectory('Select a directory', '', Dir) then
  begin
    lblDir.Caption := Dir;
    lblTrimDir.Caption := MinimizeName(Dir, Canvas, lblTrimDir.Width);
  end;
end;
Figure 9: The shell directory selection dialog
Selecting a computer on the network
This pre-packaged functionality is good, but what about invoking shell dialogs through our own efforts? Let’s say we want to have the user select a computer on the local network that we can try and locate a DCOM server on.
Fortunately the Delphi source code helps out here again. Delphi 5 comes with the source to many of the property and component editors used by the standard components. In the Source\Property Editors directory, the file MidReg.Pas contains the code for the MIDAS property and component editors. In particular, a class called TComputerNameProperty does just what we want. Well, almost. Of course the class is designed as a property editor, so a small amount of work is required to turn it into a function (see Listing 15).
Indeed there was a small bug in the property editor that also needed to be fixed, which was to use the shell’s memory allocator to free the shell item identifier list after the dialog has been finished with.
Listing 15: Invoking a computer browse dialog
uses
  ShlObj;

function GetComputerName: String;
var
  BrowseInfo: TBrowseInfo;
  ItemIDList: PItemIDList;
  ComputerName: array[0..MAX_PATH] of Char;
  WindowList: Pointer;
  Success: Boolean;
  Malloc: IMalloc;
begin
  OleCheck(SHGetMalloc(Malloc));
  if Failed(SHGetSpecialFolderLocation(Application.Handle,
            CSIDL_NETWORK, ItemIDList)) then
    raise Exception.Create('Computer Name Dialog Not Supported');
  try
    FillChar(BrowseInfo, SizeOf(BrowseInfo), 0);
    BrowseInfo.hwndOwner := Application.Handle;
    BrowseInfo.pidlRoot := ItemIDList;
    BrowseInfo.pszDisplayName := ComputerName;
    BrowseInfo.lpszTitle := 'Select Remote Machine';
    BrowseInfo.ulFlags := BIF_BROWSEFORCOMPUTER;
    WindowList := DisableTaskWindows(0);
    try
      Success := SHBrowseForFolder(BrowseInfo) <> nil;
    finally
      EnableTaskWindows(WindowList);
    end;
    if Success then
      Result := ComputerName
    else
      Result := ''
  finally
    Malloc.Free(ItemIDList)
  end
end;
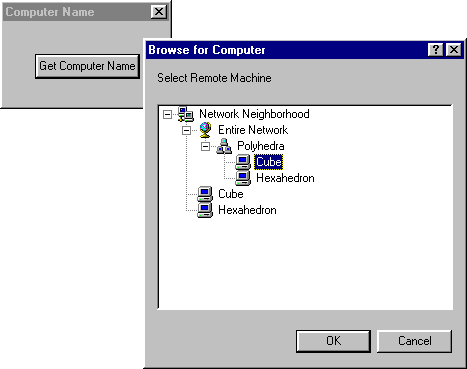
You can see the function makes use of a Windows shell routine, SHBrowseForFolder, set up to look for computer names. A simple test project is on the disk as ComputerNameSelector.Dpr and can be seen strutting its stuff in Figure 10.
Figure 10: Browsing for a computer
If your application makes changes to the Windows registry, or updates system files, it is important to get Windows restarted. When Control Panel applets make these type of changes, they all invoke a standard looking dialog to offer the user the choice of rebooting.
Using this dialog in our own applications will give consistency with Windows. Additionally, the Windows 95/98 version of this reboot dialog is rather pleasant in that if you hold the Shift key down whilst pressing the Yes button (to accept the Windows restart), it will not reboot the machine. Instead, Windows just shuts down and restarts without a reboot. This means the time taken to restart Windows is much reduced.
The API needed to spawn this dialog is undocumented, so details can be found on the aforementioned Undocumented Windows 95 web site. Translating the C syntax found on the site into Delphi gives this declaration:
function RestartDialog(hwndOwner: HWnd; lpstrReason: PChar;
uFlags: UINT): Integer; stdcall; external 'Shell32.Dll' index 59;
The first parameter is the window that owns the dialog. The second parameter is an optional string (we will come back to this). The last parameter can take the same values supported by both ExitWindowsEx and ExitWindows, including ew_RestartWindows. In fact it is the ew_RestartWindows flag that is used to get the Shift key to do its thing. The function returns mrYes or mrNo, dependent on the button pressed. If mrYes is returned, Windows will attempt to restart (but may no be successful due to another application objecting).
The dialog always has a caption of System Settings Change. Assuming the lpstrReason parameter is nil, the dialog displays a default message. If uFlags is ewx_ShutDown the text is Do you want to shut down now? All other values use the message You must restart your computer before the new settings will take effect. Do you want to restart your computer now?
If lpstrReason has a textual value then it is written as the first piece of text in the dialog, followed immediately by whatever text would be written anyway. Because it is immediately followed by the other text, you should finish the parameter with a space, or a carriage return character. If lpstrReason starts with a # character, the normal text is not written in the dialog box.
In the documented portion of the Win32 API, any routines that take textual versions have two implementations. Take FindWindow for example. There is not really any such routine as FindWindow. Instead, Windows implements FindWindowA and FindWindowW like this:
function FindWindowA(lpClassName, lpWindowName: PAnsiChar): HWND; stdcall;
external 'user32.dll' name 'FindWindowA';
function FindWindowW(lpClassName, lpWindowName: PWideChar): HWND; stdcall;
external 'user32.dll' name 'FindWindowW';
FindWindowA takes ANSI strings (PAnsiChars actually) and FindWindowW is defined to take Unicode strings (wide strings, or PWideChars in C lingo). This allows developers to write applications using normal ANSI strings or Unicode applications. The Pascal function name FindWindow is defined in the Windows import unit to map onto FindWindowA:
function FindWindow(lpClassName, lpWindowName: PChar): HWND; stdcall;
external 'user32.dll' name 'FindWindowA';
RestartDialog is not documented and so is slightly different. On Windows 95 it always takes ANSI strings and on Windows NT it always takes Unicode strings. As a consequence, when passing textual information to this API you need to check which platform you are running on to ensure that you pass the right type of characters along.
Figure 11 shows a form with 4 buttons, each of which executes a line of code similar to that written in its caption. Below the form are screen shots of the four dialogs generated. The last two buttons do send text to RestartDialog as you can see, and so in fact the implementations of their button handlers are not quite as straight forward as they could be.
Figure 11: The Windows restart dialog
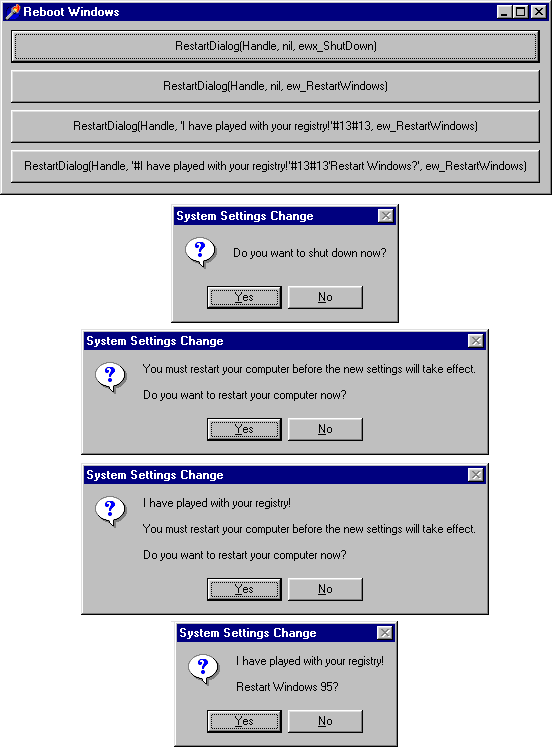
Listing 16 shows how to write platform dependent code for these buttons. You can see that two import declarations for RestartDialog have been written, one for use in Windows 95, one for use in Windows NT. If no text is being passed to the API, it is irrelevant which one you choose.
As you can see, when you define a Pascal string constant it doesn’t matter what string data type a subroutine call is expecting. Your constant can be passed along quite happily. In fact, the same string constant can be passed along to several routines, as a String, ShortString, WideString, PChar, PAnsiChar and PWideChar, and the compiler deals with the requirements sensibly, translating the string when needed.
This code can be found in the Delphi 2 (or later) RestartSample.dpr project.
Listing 16: Code to invoke the restart dialog
function RestartDialog(hwndOwner: HWnd; lpstrReason: PChar; uFlags: UINT): Integer; stdcall;
external 'Shell32.Dll' index 59;

function RestartDialogW(hwndOwner: HWnd; lpstrReason: PWideChar; uFlags: UINT): Integer; stdcall;
external 'Shell32.Dll' index 59;

procedure TForm1.Button3Click(Sender: TObject);
const
  Msg = 'I have played with your registry!'#13#13;
begin
  if Win32Platform = VER_PLATFORM_WIN32_WINDOWS then
    RestartDialog(Handle, Msg, ew_RestartWindows)
  else
    RestartDialogW(Handle, Msg, ew_RestartWindows)
end;

procedure TForm1.Button4Click(Sender: TObject);
begin
  if Win32Platform = VER_PLATFORM_WIN32_WINDOWS then
    RestartDialog(Handle, '#I have played with your registry!'#13#13 +
      'Restart Windows 95?', ew_RestartWindows)
  else
    RestartDialogW(Handle, '#I have played with your registry!'#13#13 +
      'Restart Windows NT?', ew_RestartWindows)
end;
Note that you might need your application to restart along with Windows. This subject is covered later in this paper.
Locating An Arbitrary Application Window
The FindWindow API is useful for locating an arbitrary window that exists in any running application, however it is limited to locating top-level windows. For example, if you wanted to locate Microsoft Word running on a machine and bring it to the foreground, you might write code like that shown in Listing 17. FindWindow is passed the window class of the target window (OpusApp in the case of Word) and an optional window caption (not passed in this case).
Listing 17: Using FindWindow to locate and show Word
var
  WordWnd: HWnd;
...
WordWnd := FindWindow('OpusApp', nil);
if WordWnd <> 0 then
begin
  //Restore app if necessary
  if IsIconic(WordWnd) then
    SendMessage(WordWnd, wm_SysCommand, sc_Restore, 0);
  SetForegroundWindow(WordWnd)
end
This is fine until you need to access a child window on some form somewhere in the system. In this case you typically use FindWindow to locate the target window’s top-level parent, and then enumerate through all its children using EnumChildWindows until you find the target window.
If you need to identify the top level window using some attribute other than the class name and/or window caption, you can enumerate all top level windows instead, using EnumWindows. Then when you find the appropriate one, enumerate its children with EnumChildWindows.
EnumWindows takes a pointer to an enumeration routine that will be called once for each top level window that is found. The routine must have a specified signature and should return True to keep enumerating more windows, or False to indicate that the target window has been located. Listing 18 shows some code that achieves much the same as Listing 17, but with more typing. However it can be used as a basis for more useful tests to locate a specified window.
Listing 18: Using EnumWindows to locate and show Word
function EnumWindowFunc(Wnd: HWnd; lParam: Longint): Bool; stdcall;
var
 Buf: array[0..255] of Char;
begin
  Result := True;
  if GetClassName(Wnd, Buf, SizeOf(Buf)) > 0 then
    if StrIComp(Buf, 'OpusApp') = 0 then
    begin
      HWnd(Pointer(lParam)^) := Wnd;
      Result := False;
    end
end;
...
var
  WordWnd: HWnd;
...
EnumWindows(@EnumWindowFunc, Integer(@WordWnd));
if WordWnd <> 0 then
begin
  //Restore app if necessary
  if IsIconic(WordWnd) then
    SendMessage(WordWnd, wm_SysCommand, sc_Restore, 0);
  SetForegroundWindow(WordWnd)
end
EnumChildWindows works in much the same way as EnumWindows, as you can see in Listing 19. The code uses FindWindow to quickly locate Word and then brings it to the front. Then it enumerates through all the child windows looking for an instance of an editor window (which has a class name of _Wwg in Word 97). If one is found, it highlights it on the screen by iteratively inverting a five pixel rectangle around the editor.
All this code can be found in the FindWord.dpr project.
Listing 19: Locating a child window with EnumChildWindows
function EnumChildWindowFunc(Wnd: HWnd; lParam: Longint): Bool; stdcall;
var
 Buf: array[0..255] of Char;
begin
  Result := True;
  if GetClassName(Wnd, Buf, SizeOf(Buf)) > 0 then
    if StrIComp(Buf, '_Wwg') = 0 then
    begin
      HWnd(Pointer(lParam)^) := Wnd;
      Result := False;
    end
end;
...
var
  WordWnd, WordEditorWnd: HWnd;
  Loop: Integer;
  Rect: TRect;
  Canvas: TCanvas;
...
WordWnd := FindWindow('OpusApp', nil);
if WordWnd <> 0 then
begin
  //Restore app if necessary
  if IsIconic(WordWnd) then
    SendMessage(WordWnd, wm_SysCommand, sc_Restore, 0);
  SetForegroundWindow(WordWnd);
  //Give Word chance to be brought foreground, or restore itself
  Sleep(250);
  //Locate editor
  EnumChildWindows(WordWnd, @EnumChildWindowFunc, Integer(@WordEditorWnd));
  if WordEditorWnd <> 0 then
  begin
    //Get editor co-ordinates
    Windows.GetClientRect(WordEditorWnd, Rect);
    //Change width/height to be right/bottom
    Rect.BottomRight := Point(Rect.Left + Rect.Right, Rect.Top + Rect.Bottom);
    //Turn client-relative co-ordinates into screen-relative co-ordinates
    Windows.ClientToScreen(WordEditorWnd, Rect.TopLeft);
    Windows.ClientToScreen(WordEditorWnd, Rect.BottomRight);
    //Set up canvas for whole desktop and flash the editor a few times
    Canvas := TCanvas.Create;
    try
      Canvas.Pen.Mode := pmNot;
      Canvas.Pen.Width := 5;
      Canvas.Handle := GetDC(HWnd_Desktop);
      try
        for Loop := 1 to 8 do
        begin
          Canvas.Polyline([Rect.TopLeft, Point(Rect.Right, Rect.Top),
                           Rect.BottomRight, Point(Rect.Left, Rect.Bottom),
                           Rect.TopLeft]);
          Sleep(100);
        end
      finally
        ReleaseDC(HWnd_Desktop, Canvas.Handle)
      end
    finally
      Canvas.Free
    end
  end
end;
This is a simple problem to solve as there is a single dedicated API that does the job called GetUserName. This call requires a PChar that refers to some memory and a DWord variable that indicates the amount of memory provided.
To avoid memory management calls, a character array is used for the PChar parameter. This array can be assigned to the function’s result String when done and Delphi will translate from the null-terminated string format to the Delphi string format automatically. Listing 20 shows the result.
Listing 20: Finding the logged in user’s name
function UserName: String;
var
  Buf: array[0..255] of Char;
  BufLen: DWord;
begin
  BufLen := SizeOf(Buf);
  Win32Check(GetUserName(Buf, BufLen));
  Result := Buf
end;
Identifying The Current Windows Version
The SysUtils unit defines an under-used variable, Win32Platform, that can tell you which Windows platform you are running on (Windows or Windows NT). This helps when calling OS-dependant Win32 APIs and has existed since Delphi 2.
Delphi 3 added some additional support variables: Win32MajorVersion, Win32MinorVersion and Win32BuildNumber (only use the low word of this variable), along with Win32CSDVersion. This last one will hold the Corrected Service Diskette (or Service Pack) number as a textual string in the case of Windows NT/2000, or some arbitrary version-specific information about the operating system in the case of Windows 95/98.
If Win32Platform says you are running Windows (not NT), then you can use the version number variables to distinguish between Windows 95 and Windows 98 (and probably Millennium Edition).
If Win32MajorVersion is 4 and Win32MinorVersion is 0 (which means the complete version number is 4.0) you are running Windows 95. If Win32MajorVersion is 4 and Win32MinorVersion is more than 0, or Win32MajorVersion is more than 4 (in other words your complete version number is greater than 4.0), you are running Windows 98 or Windows Millennium Edition (ME). Windows ME in its current pre-release versions has a version number of 4.90.
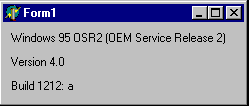
Listing 21 shows how to distinguish between the current platform versions, although this may need modifying once the shipping version number for Windows Millennium Edition is known. This code can be found in the Win32VersionCheck.dpr Delphi 3 (or later) project, which also does some further analysis to identify Windows 95 OSR2 (the low word of the build number is more than 1080), as shown in Figure 12.
Listing 21: Detecting the current Windows version
type
  TWin32Version = (wvUnknown, wvWin95, wvWin98, wvWinME, wvWinNT, wvWin2000);

function Win32Version: TWin32Version;
var
  VerNo, VerWin95, VerWinME: Integer;
begin
  Result := wvUnknown;
  VerNo := MakeLong(Win32MajorVersion, Win32MinorVersion);
  VerWin95 := MakeLong(4, 0);
  VerWinME := MakeLong(4, 90);
  if Win32Platform = VER_PLATFORM_WIN32_WINDOWS then
  begin
    if VerNo = VerWin95 then
      Result := wvWin95
    else
      if (VerNo > VerWin95) and (VerNo < VerWinME) then
        Result := wvWin98
      else
        if VerNo >= VerWinME then
          Result := wvWinME
  end
  else
    if Win32MajorVersion <= 4 then
      Result := wvWinNT
    else
      if Win32MajorVersion = 5 then
        Result := wvWin2000
end;
Figure 12: Identifying the Windows version
Calling A Windows-Version Specific API
Some useful Windows API routines are not available under all versions of the Win32 API. For example, CoInitializeEx, the extended version of CoInitialize which initialises the COM subsystem is only guaranteed to be available on Windows 98, Windows NT 4 or Windows 2000. It will exist on Windows 95 if DCOM for Windows 95 has been installed.
Another example is FlashWindowEx, the extended version of FlashWindow, which does not exist in Windows 95 or Windows NT 4 and earlier.
The Microsoft Platform SDK dictates the Win32 implementations required to call any given API or access any system facility, and you should use this information. Sometimes however, features are added to Windows at strange times. Another COM facility is called the Global Interface Table (or GIT). This is available on Windows 2000, Windows 98, Windows 95 if DCOM for Windows 1.2 is installed and on Windows NT 4.0 in Service Pack 3.
As you can see, you might sometimes have to some deep checking to see if something is available.
Generally speaking, for API calls, rather than checking to see if the right version of Windows is running, it is easier to just see if the routine exists, and only call it if this is the case. This is exactly what the ComObj RTL unit does with CoInitializeEx. It calls it if it is available, otherwise it falls back on the less flexible (but always present) CoInitialize.
To see the idea, we will use a new Windows 2000 API that allows us to have translucent windows, by taking advantage of the layered window concept introduced by this operating system. Since Delphi 5 does not have an import declaration for this API, the Platform SDK was used to glean information to provide a declaration.
The idea will be to make an application’s main form appear semi-translucent in Windows 2000, but leave it normal on other operating environments. Incidentally, it should be made clear that just calling the routine after checking the version of the operating system will not be good enough.
If we did so, the compiler would record the call to the relevant imported routine in the executable header. Other operating system versions such as Windows 95 would notice the bogus (to them) reference and halt the process dead.
Instead we need to be much craftier. We declare a procedural type laid out exactly as the API is. Then we declare a variable of that type (effectively a pointer), which defaults to nil. At some point before the requirement to call it, we try and locate the routine by passing its name to GetProcAddress and assigning the result into the procedural variable. If we get a non-nil value back we can call the routine through the variable, otherwise we don’t.
Listing 22 shows the code from the Delphi 2 (or later) project LayeredWindow.dpr. Notice that the form requests semi-translucency by calling SetTranslucentForm in the OnCreate event handler. Also, in order for it to work, the form specifies a layered extended window style in an overridden CreateParams method.
Listing 22: Checking for a Win32 API before calling it
const
  lwa_Alpha = 2;
  ws_Ex_Layered = $80000;

procedure SetTranslucentForm(Form: TForm);
type
  TSetLayeredWindowAttributesProc = function (Wnd: HWnd;
    crKey: ColorRef; bAlpha: Byte; dwFlags: DWord): Bool; stdcall;
const
  User32Handle: HModule = 0;
  SetLayeredWindowAttributes: TSetLayeredWindowAttributesProc = nil;
begin
  if User32Handle = 0 then
  begin
    //User32 will be in memory, so no need for LoadLibrary
    User32Handle := GetModuleHandle(User32);
    @SetLayeredWindowAttributes := GetProcAddress(User32Handle,
      'SetLayeredWindowAttributes');
  end;
  if @SetLayeredWindowAttributes <> nil then
    Win32Check(SetLayeredWindowAttributes(
      Form.Handle, 0, 128, lwa_Alpha))
end;

procedure TForm1.CreateParams(var Params: TCreateParams);
begin
  inherited;
  //Need to set layered extended attribute
  //This has no effect on platforms that do not understand it
  Params.ExStyle := Params.ExStyle or ws_Ex_Layered
end;

procedure TForm1.FormCreate(Sender: TObject);
begin
  //Request semi-translucent window as form is created
  SetTranslucentForm(Self)
end;
Launching An Application On Windows Restart
When you shut Windows with Windows Explorer still running, and maybe Microsoft Internet Mail also running, the next time Windows comes up, those applications restart as well. You may wish your application to exhibit the same behaviour.
There are a number of ways to do this, but most of them require more work than is worthwhile. For example, you could add a shortcut to your program to the Startup folder as Windows exits, and make sure you delete it as your program starts up again.
The best way to do this is the way that Windows itself uses. There is a registry key set up for exactly this job. What you need to do is to programmatically add a string value for your program under HKEY_CURRENT_USER\Software\Microsoft\Windows\CurrentVersion\RunOnce. If you write an appropriate value there when Windows is terminating, then during its next relaunch Windows will execute all the commands in the RunOnce section after the same user logs in, and then delete them.
On the other hand, if you add a value into HKEY_LOCAL_MACHINE\Software\Microsoft\Windows\CurrentVersion\RunOnce, Windows will execute the program before logging in (and will wait for the program to finish before doing so). This will happen regardless of user.
As Windows is closing down a wm_EndSession message is sent around to all top level windows. A message handler for this message can be used to write your program’s last will and testament into the registry before terminating. Listing 23, from the sample Delphi 2 (or later) project Restart.Dpr, contains a possible implementation.
Notice that it adds a string value identified by the Application object’s Title property to the registry key. The value written is the entire command-line (command-line parameters as well) to ensure that the program starts up in the same mode as it was started this time.
Listing 23: Making an application restart with Windows
type
  TForm1 = class(TForm)
    ...
  public
    procedure WMEndSession(var Msg: TWMEndSession);
      message wm_EndSession;
  end;
...
uses
  Registry;
...
procedure TForm1.WMEndSession(var Msg: TWMEndSession);
const
  Restart = 'Software\Microsoft\Windows\CurrentVersion\RunOnce';
begin
  if Msg.EndSession then
  begin
    with TRegistry.Create do
      try
        //If you want to run your app before any user
        //logs in then uncomment the next line of code
        //RootKey := HKEY_LOCAL_MACHINE;
        if OpenKey(Restart, True) then
          //Write a value with an arbitrary name,
          //But the full path to your exe as a value
          WriteString(Application.Title, CmdLine)
      finally
        Free //Destructor calls CloseKey for us
      end;
    Msg.Result := 0
  end;
  inherited
end;
This paper has tried to introduce you to a number of under-the-hood techniques in Delphi as well as how to achieve a number of goals using the Win32 API. The Delphi RTL and VCL are rich in under-used facilities, many of them undocumented anywhere but the source. Use the source well, and you will become more and more competent in your Delphi programming.
Click here to download the files associated with this paper.
Brian Long used to work at Borland UK, performing a number of duties including Technical Support on all the programming tools. Since leaving in 1995, Brian has spent the intervening years as a trainer, trouble-shooter and mentor focusing on the use of the C#, Delphi and C++ languages, and of the Win32 and .NET platforms. In his spare time Brian actively researches and employs strategies for the convenient identification, isolation and removal of malware. If you need training in these areas or need solutions to problems you have with them, please get in touch or visit Brian's Web site.
Brian authored a Borland Pascal problem-solving book in 1994 and occasionally acts as a Technical Editor for Wiley (previously Sybex); he was the Technical Editor for Mastering Delphi 7 and Mastering Delphi 2005 and also contributed a chapter to Delphi for .NET Developer Guide. Brian is a regular columnist in The Delphi Magazine and has had numerous articles published in Developer's Review, Computing, Delphi Developer's Journal and EXE Magazine. He was nominated for the Spirit of Delphi award in 2000.