
This month Brian Long looks at how to dynamically create objects in code instead of using the Component Palette and Form Designer.
This article first appeared in Linux Format Issue 24, February 2002.
Click here to download the files associated with this article.
If you find this article useful then please consider making a donation. It will be appreciated however big or small it might be and will encourage Brian to continue researching and writing about interesting subjects in the future.
The Kylix IDE is great at making form creation and component creation a triviality, but sometimes it is useful to know how to create objects any time you like in program code. There are various reasons for this, for example:
Each of these requires knowledge of the steps to create and destroy objects and that's what we will focus on this month.
The first thing to understand when dynamically creating objects is that the process is different from normal variables. If you need an integer variable, you declare it and the job is done.
|
The variable declaration itself ensures sufficient storage for the integer data is available in the routine.
With objects, the declaration alone is insufficient. Something like this does not make a TEdit control available to the program.
|
It acts simply as a reference to a potential TEdit that must be brought to life with some code. The MyEdit variable is called an object reference as (hopefully) it will ultimately reference a TEdit control.
Depending on where the object reference is declared, it will start life with varying values. If it is a local variable, as above, it will contain complete garbage as local variables are not initialised. If it is a global variable or a data field in a class, it will be initialised with zero value bytes, giving it a value of nil (a Kylix reserved word representing a pointer that points to address 0). Either way, before it can be useful you must make it refer to an instance of the specified class.
To construct an instance of the class you must call the class constructor, a special method designed to allocate space for and initialise a fresh instance. Every Kylix class has a constructor called Create and various classes define different required parameters or indeed alternative constructors.
For example this constructs a TEdit object and assigns its address to the MyEdit object reference.
|
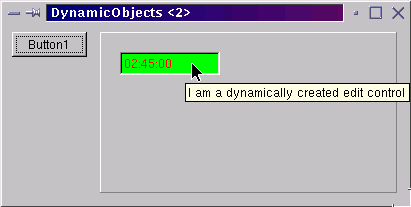
I'll come back to the parameter that the TEdit constructor (and the constructor of all other component and form classes) takes momentarily. For now, what is important is that the object is now ready for you to set its properties, which for a component is normally done on the Object Inspector. Instead we now do it in code. The code below sets up a number of properties and you can see the result in Figure 1.

Figure 1: We think this one speaks for itself
|
Note the Parent property which specifies the control's parent window (the one it draws relative to and within) as the panel.
Also note that for this component to be seen and accessed elsewhere in the program code, it will be necessary to make the object reference a data field of the form class rather than a local variable, which would be inaccessible after the event handler finishes.
Now that we can construct a component (an act that consumes some resources) we should remember programming etiquette and consider how to dispose of it when it is no longer needed. The opposite of constructing a component is destroying it, which is done with the destructor.
Every Kylix class has a destructor called Destroy but convention says you never call Destroy directly. Instead you call the Free method that calls it for you after doing a quick safety check.
So the rule is that if you construct an object it is your responsibility to destroy it at some point. If you need a control for as long as the form exists you could destroy it in the form's OnDestroy event handler (triggered as the form is being destroyed). You can see appropriate code to destroy the control later.
In the case of components and forms there is another option at your disposal. You can elect to assign an owner for your component (see Figure 2). The owner should be some other component or form that you know will get destroyed and its job will be to destroy all components that it owns during its own destruction.
Figure 2: Component constructors take an owner
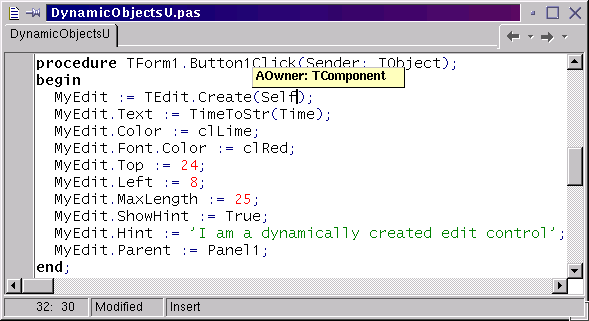
In the code above, Self was passed as the owner for the edit control; Self is an identifier available in any method. Bearing in mind that any given class can have many instances created it is sometimes useful when writing a method to be able to refer to the instance whose method is executing. Self does exactly that.
Recall that event handlers are all methods of the underlying form. That means in any event handler Self refers to the appropriate instance of the underlying form. Of course while there is only a single instance of any form class (the default situation, which holds until you start creating additional instances) you could equally use the global form variable (e.g. Form1). Using Self is safer as it caters for future expansion of the program and multiple instances of the same form type being created.
Self refers to the current form instance (in the case of event handlers and other form methods) and Sender (if available as an event handler parameter) refers to the object that triggered the event. So the earlier code ensures the edit control is owned by the form it is created by and will therefore be destroyed along with the form.
The edit control works well once it is created and we set its properties as needed. However, we have not examined how to set up event handlers for dynamically created components.
Events are actually defined exactly the same way as properties; however event properties are defined with procedural types. This means they can refer to a routine that conforms to their type. The following declarations were found in the online help and they show how OnClick is defined as a TNotifyEvent property.
|
TNotifyEvent itself is defined as any procedure method (that's what of object means) that has a single TObject parameter called Sender.
All events are defined to require a method (typically a procedure method) with varying parameter lists, which is why event handlers are created as methods (of the underlying form class).
To make an event handler for one of the edit's events we simply look at the event definition and then make a method that matches its type. The other part of the job is just like any other property - you assign the value to the property, meaning assign the method to the event.
To show how the principle works, we'll set up event handlers for the edit control's OnKeyPress and OnExit events, which will be used to prevent the letter X being entered (an arbitrary choice of restriction).
The OnKeyPress event is triggered for every character you enter and it allows you to void any character you don't wish to accept. However, the user could still paste text containing X and this would not be picked up, so we use OnExit to validate the edit control's content when focus leaves the control (for example when you press the Tab key or click on another control). Any X characters found will simply be stripped out.
To set this up, we first need to know the types of the two events. The online help for OnKeyPress says:
|
This tells us that an event handler for OnKeyPress looks much like an OnClick event handler but with an extra var parameter (pass-by-reference parameter) that defines the character entered. The help for OnExit says it is a TNotifyEvent property, so we know the signature for that one.
In the form class, declare two methods that adhere to these definitions and set up appropriate implementations for them in the unit's implementation section:
|
To turn these into event handlers, we assign the routines to the event properties at the same time as setting up all the other properties:
|
Now the two methods are just as much valid event handlers as those set up by the Object Inspector (these steps are much the same as those performed by the Object Inspector), so the next job is to add some code to them.
In the case of the OnKeyPress event handler we should examine the Key parameter to see if it is a letter X and if so, hide it from the edit control. The Key parameter is defined as type Char (a synonym for the AnsiChar type), which is an ordinal type that can represent one character at a time. This is different from the String (or AnsiString) type, which allows you to represent a string of any number of characters from none up to 2Gb characters.
Note that for internationalised applications you might be more interested in the WideChar and WideString types, as they can handle a single 16-bit Unicode character and a string of 16-bit Unicode characters respectively.
To hide the character from the edit control we simply change its value to character 0 (remember that it is a pass by reference parameter so this will be communicated back to the code that triggered the event handler). You can represent a non-printable character by using a control string, which is a hash sign (#) followed immediately by the numeric character position. So a line break character would be #10.
A common way of implementing the requirement for this event handler, bearing in mind the X could be uppercase or lowercase, would be to write something like this:
|
or maybe even the following. Note that UpCase takes a single character and uppercases it; you use UpperCase to uppercase a whole string.
|
However, Object Pascal supports set notation to simplify these types of expressions. Just like you used to do in maths lessons, you can take a value (such as the entered character) and identify if it belongs to a specified set (such as the character set made out of an uppercase and a lowercase X):
|
Sets can be constructed using subranges as well, so to check for the last three letters of the alphabet you can write:
|
The OnExit event handler needs to examine the text in the edit control and strip out any X characters if present. In the code below a local object reference variable has been used to save repeating the runtime typecast operation.
|
Assuming an occurrence of X can be found in the string (note the string is uppercased to simplify the check) the convenient StringReplace function is used to remove them (by replacing X with nothing). The third parameter to StringReplace is another example of a set, this time a set of flags that control the function's operation. In this case, all occurrences are replaced and case is ignored, so both uppercase and lowercase X characters are removed.
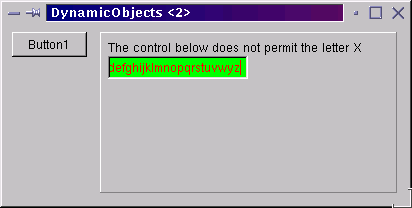
Figure 3 shows the program running with the dynamically instated event handlers set up after each letter of the alphabet was entered into it. You can see the character we have restricted it from accepting is missing.
Figure 3: The filtered edit control
The button on the form (whose name should be changed to something descriptive, such as btnCreate) has a bit of a flaw currently, as you can keep pressing it indefinitely, thereby making more and more edit controls, which all sit on the form at the same place. It should really check to see if the control has been created before creating a new one. We can also have another button (btnDestroy) whose job is to destroy the component when we no longer need it.
|
Since the object reference starts life with a value of nil (thanks to it being declared as part of the form class) we can check it against nil to see if it has been created yet. When we destroy the control, we should reset the reference back to nil so the checking code still works.
A couple of notable points are:
Of course if we were using action objects in this project, their OnUpdate event handlers could check the object reference to decide what to set their Enabled property to.
In an event handler you are in the scope of the form, as has been mentioned before. Sometimes it can be useful to enter the scope of another object, particularly if you need to access several of its properties or methods. The with statement performs this job, so the edit creation button event handler could be rewritten like this, if required:
|
A standard feature in many Linux applications is a configuration file. This may be stored in the /etc directory if its content applies to all users. If the application has settings that will be different for each user a configuration file will be stored as a hidden file in the user's home directory (or some hidden directory off the home directory).
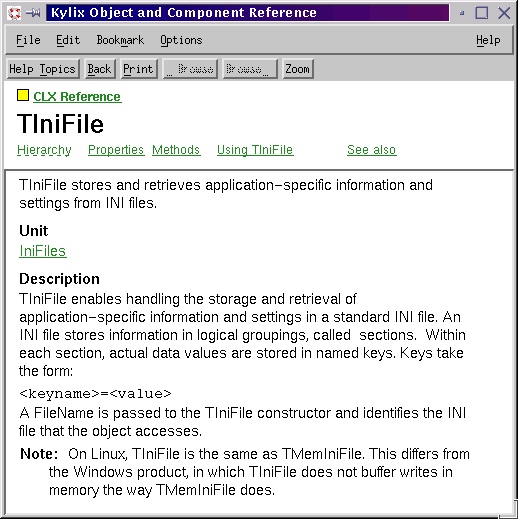
Configuration files are simply text files, and are usually organised as sections filled with related information. The TIniFile class (from the IniFiles unit, according to the online help, as you can see in Figure 4) allows us to use these kinds of configuration files very easily (in Microsoft Windows these types of file are identified by an .INI extension indicating they are initialisation files). Note that TIniFile is not a component and so it does not have the ability to have an owner.
Figure 4: Online help description of TIniFile class
Let's try using it to save some settings from this project. We will let the user choose the form colour and save that to a configuration file. The first thing we need for this is an object reference of type TIniFile, which should be declared in the form class to ensure it is available to all the event handlers. This will require you to add the IniFiles unit to the interface section uses clause.
Note that in any given section of a class, all the data fields must be defined first followed by all the method declarations.
The INI file object should be created in the form's OnCreate event handler (triggered as the form is initially created) and destroyed in the form's OnDestroy handler (remember that we must destroy this object since it will not have an owner), thereby ensuring the object will be available for the entire duration of the form.
|
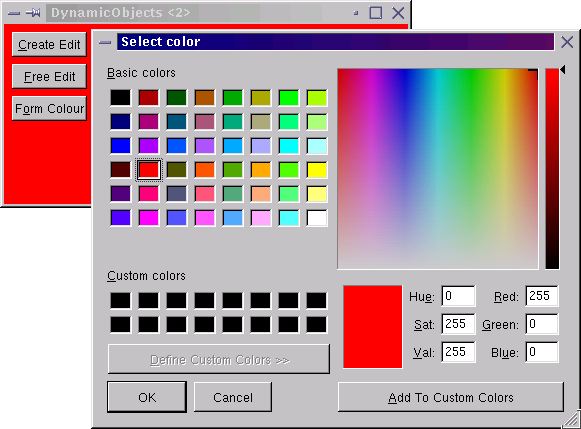
Now you should add a colour dialog component (called dlgColour) from the Component Palette's Dialogs page and a button (btnColour). The button invokes the dialog by its Execute method and checks the return value (False means the user pressed Cancel and we should proceed no further). If True is returned we assign the dialog's Color property (which tells us what the user chose) and assign it to the form's Color property. Figure 5 shows the colour dialog being invoked.
Figure 5: Choosing a form colour in a Kylix application
Additionally we should write the new colour to the INI file. Since we need to refer to a file section and a section setting both when writing and reading, it would be prudent to define some constants.
Some remaining jobs are then to read the colour from the file after creating the INI file object, and also to update the INI file on disk just before destroying the object. The extra code looks like this:
|
Notice that when reading a value the third parameter is a default to use if the requested value cannot be found for any reason (such as the INI file does not exist).
This code writes the colour out as an integer value, which is exactly what it is (although it ultimately gets written out as a string since the INI file is a text file). However there are various constants defined for some of the standard colours and you may prefer to have these more readable identifiers used instead. If so you should use the ReadString and WriteString methods along with the ColorToString and StringToColor translation methods as follows:
|
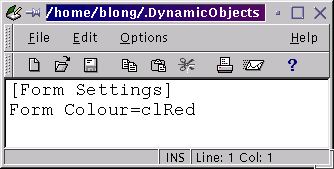
This produces a file with contents something like Figure 6 when a red colour is selected, but still writes out the integer value for colours that do not have a corresponding constant.
Figure 6: An application configuration file
Forms themselves are another area of Kylix development where dynamic object creation is useful. By default every form in a Kylix application is created when the application starts, although only the main form is displayed by default. All forms then stay in existence until the program exits.
This design is for simplicity - if you want to access a form it will be there. However it means that applications are not particularly resource efficient. Consider an application with 100 forms in; if a user launches the application and accesses only 3 forms, then the other 97 are created for no point. They occupy memory and consume resources for no point other than programmer convenience.
Creating forms dynamically on demand allows an application to start more promptly (it won't be spending time creating possibly unneeded forms) and means the application takes up less memory and other resources (it becomes a leaner app).
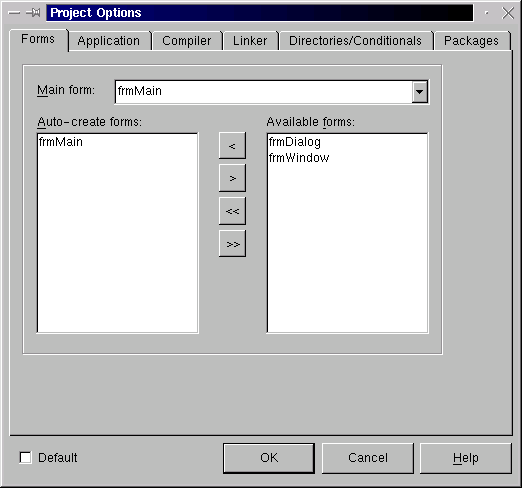
Let's go back to last month's multi-form program and see how to change it to create the forms dynamically. The project had a main form, a window and a dialog (see Figure 7). The project options dialog (Shift+Ctrl+F11) confirms that all three forms are created automatically at program startup (see Figure 8). This list corresponds to form creation statements in the project source file (Project | View Source).
Figure 7: Our multi-form application
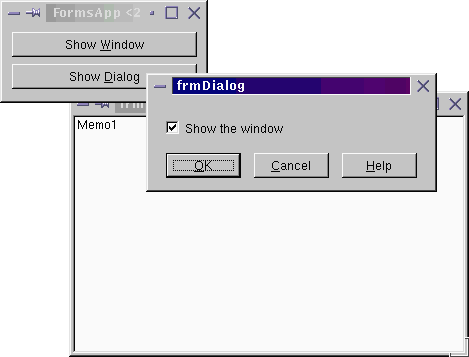
Figure 8: A list of auto-created forms
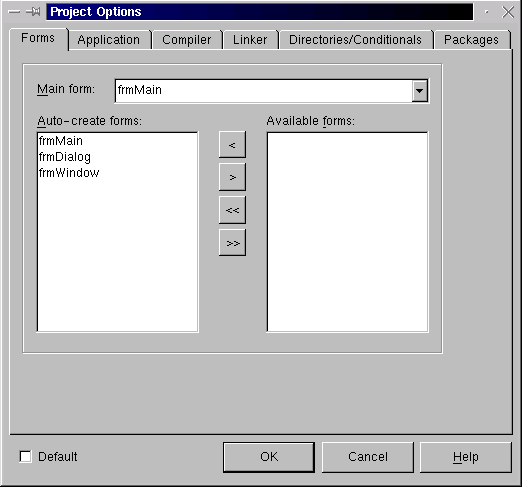
Rather than changing the project source, you can change which forms are created in the dialog, so use the buttons to move the window and dialog forms to the other list box (see Figure 9).
Figure 9: Two forms that are not auto-created
Now we need to change the code that invokes these forms. For the dialog, the relevant main form button event handler needs to look like this (note the form is owned by the Application object, just as it is when it is auto-created):
|
For the window form things are a little different. We still create it before calling the Show method to display it, but Show returns immediately (unlike ShowModal, which returns when the dialog is closed). So to cater for dynamically created modeless forms you can make an OnClose event handler for them. This event handler has a var parameter that can be given a value to tell the form it should destroy itself.
|
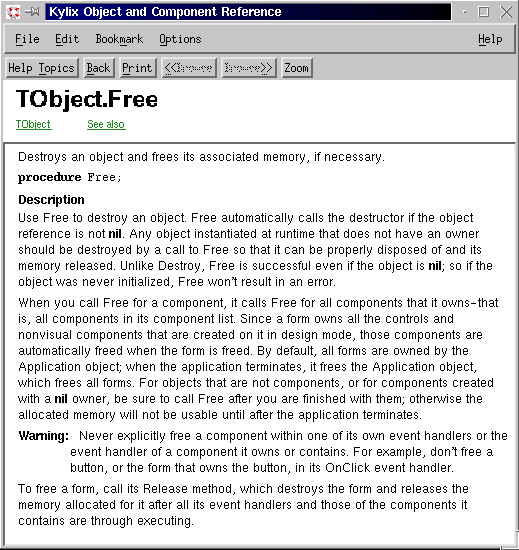
Alternatively you can call the form's Release method, which has the same effect. Calling Free is not an option for this job - there is a warning in the online help on this matter (see Figure 10).
Figure 10: Online help for Free method
Kylix users sometimes bump into problems when first installing or running Kylix. To help out in these situations here are a list of tips to overcome the more common problems people encounter.
The setup program Borland use for Kylix is based on the open-source Setup project from Loki Games. It seems that when you run it on Red Hat Linux 7.1 (and probably other, more recent distros) it encounters a problem with the RPM installer, where it incorrectly parses the destination directory. Attempts to install are met with the message:
Error Code: -10. Setup cannot continue. If this error persists, please contact Technical Support.
To avoid the problem you should run the setup.sh script with the -m command-line switch, which tells the script not to use RPM.
When Kylix starts, the WINE library used by the IDE does some initialisation involving collecting data on the installed fonts. However on a 2.4 level kernel this process seems to get stuck and Kylix never starts.
The only suggested workaround I can find is to prevent the dialog from appearing in the first place. You can do this by renaming the pertinent file. Use the following commands, substituting your installation directory if it differs from /opt/kylix.
cd /opt/kylix/bin
mv transdlg transdlg.hide.me
This is likely to be down to an issue in the way your JPEG library has been compiled. There are certain values that can be changed during the compilation of the library and this causes a problem for the JPEG image used in the Kylix splash screen.
The simplest way of avoiding the problem is to start Kylix with the -ns command-line switch to stop the splash screen being displayed. If this works you should probably avoid looking at the About box (Help | About...) as that also has a JPEG image and will probably give you: JPEG Error #21.
Since Kylix Open Edition doesn't seem to come with all the same patch files as the commercial versions, you can completely rectify the problem by getting the JPEG library source from http://www.ijg.org and making the appropriate source modifications.
Look in the file jpeglib.h and locate the symbol D_MAX_BLOCKS_IN_MCU (the JPEG decompressor's limit on blocks per MCU). If it is being defined as anything other than 10, change it back to 10 (it is apparently often changed to higher values, such as 64).
Now you can follow the directions that come with the library source code to recompile and install it. This should remedy the problem.
This seems to be upsetting a number of people. Kylix asks you to register it, so you go to the trouble of contacting Borland to get the relevant information to enter. After entering this information, Kylix says you need to enter registration information and refuses to run.
If you installed Kylix as root then you should try removing ~/.borland directory and start Kylix again. When it asks you to register again enter the same information you tried to enter before.
If you installed Kylix as a normal user, delete ~/.borland/registry.bin. Now start Kylix and again enter the registration information.
In both these cases you should be able to get past the previous recursive loop. In fact you should also be able to defer registration to some later point if you wish and have Kylix start in an unregistered form.
Being able to dynamically create objects allows your application full access to the CLX object library, which is rich with classes for you to use. Components (on the Component Palette) represent a subset of the available classes, so this technique extends your range and therefore the potential abilities of the applications you write.
Next month we will write an application that allows you to browse information about the files on the magazine cover disk. This will involve reading command-line parameters, looking for files, interpreting CSV files, using a list view control and searching for information.
Brian Long used to work at Borland UK, performing a number of duties including Technical Support on all the programming tools. Since leaving in 1995, Brian has spent the intervening years as a trainer, trouble-shooter and mentor focusing on the use of the C#, Delphi and C++ languages, and of the Win32 and .NET platforms. In his spare time Brian actively researches and employs strategies for the convenient identification, isolation and removal of malware.
If you need training in these areas or need solutions to problems you have with them, please get in touch or visit Brian's Web site.
Brian authored a Borland Pascal problem-solving book in 1994 and occasionally acts as a Technical Editor for Wiley (previously Sybex); he was the Technical Editor for
Mastering Delphi 7
and
Mastering Delphi 2005
and also contributed a chapter to Delphi for .NET Developer Guide
.
Brian is a regular columnist in The
Delphi Magazine and has had numerous articles published in Developer's Review,
Computing, Delphi Developer's Journal
and EXE Magazine. He was nominated for the Spirit
of Delphi 2000 award.