
In this first part of a tutorial series on Borland's Kylix visual development systems, Brian Long gets to grips with installing Kylix and building GUI applications.
This article first appeared in Linux Format Issue 19, October 2001.
Click here to download the files associated with this article.
If you find this article useful then please consider making a donation. It will be appreciated however big or small it might be and will encourage Brian to continue researching and writing about interesting subjects in the future.
Kylix is a component-based RAD tool from Borland, designed for developing both console and X applications for Linux, containing a source code editor, visual form designer, ObjectPascal optimising compiler, Linux ELF linker and integrated debugger.
Kylix has been around for several months now. Back in February 2001, Borland released two commercial versions of Kylix (Desktop Developer Edition and Server Developer Edition), that enabled you to build database applications and Web server applications for Linux. With those versions, you can write either GPL software or commercial/proprietary software that can be sold.
At long last, Borland have released Kylix Open Edition. This is available for free download from Borland's Web site and, more importantly, is also on this month's cover CD. This is a popular product; on the first morning that it was available, we hear it was downloaded 100,000 times. Kylix Open Edition allows you to write GPL software in an established development environment, and this tutorial series will look at how you use it and explore what can be done with it.
First things first, let's look at getting Kylix installed. Kylix and, to a lesser extent, applications built with Kylix have certain requirements that have to be met before a successful installation can take place. Borland have supplied appropriate updates to ensure Kylix will work on some Linux distros. Other distros (currently) require you to locate appropriate update files yourself.
Supported distros for Kylix 1 and Kylix 2 are:
Supported distros for Kylix 3 are:
Because of some issues with some common Linux libraries (which mean Kylix's requirements are not met) it is essential to run a sanity-check program supplied with Kylix before installing it. The program checks the critical libraries are at a suitable version level and therefore do not suffer from the pertinent issues.
Kylix requires:
There is also a Linux executable loader issue that poses problems for Kylix and Kylix applications. The issue is fixed in glibc 2.2, but Kylix comes with patches that fix the problem in glibc 2.1.2 on the supported distros (these do not seem to be distributed in the Kylix Open Edition download so will need to be obtained from the Borland Web site or other locations).
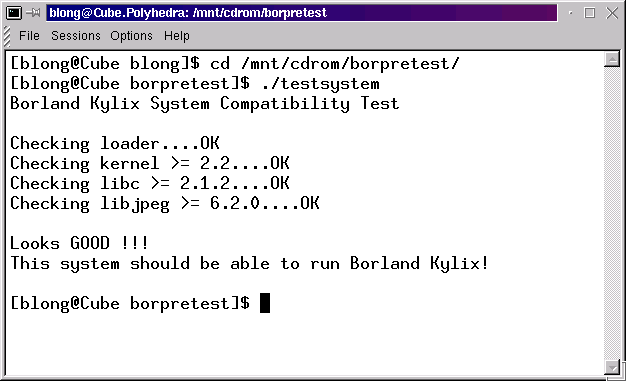
Assuming your CD is mounted and the mount point is /mnt/cdrom, this will run the pre-installation test.
cd /mnt/cdrom/borpretest
./testsystem
You can see the output of a run on a suitable distro in Figure 1. However, if the program says that one of the libraries is not up to scratch you will need to update it. The file /mnt/cdrom/PREINSTALL explains the procedure for upgrading the JPEG library and glibc on the supported distros. For other distros you will need to locate and install upgraded libraries yourself.
Figure 1: What the pre-installation test program says on a suitable distro
Once the system libraries are acceptable, you can then proceed to install Kylix itself with:
cd /mnt/cdrom
sh setup.sh
If you have the GTK library on your machine, the setup program runs as a GUI X application (see Figure 2), otherwise it runs as a simple console application, offering just the same functionality. The file /mnt/cdrom/INSTALL discusses how to best install the software. In short, it recommends you are logged in as root to do the install, but that you do not install Kylix under the /root directory tree (instead, install it in /opt/kylix or /usr/local/kylix).
Figure 2: Ready to install Kylix
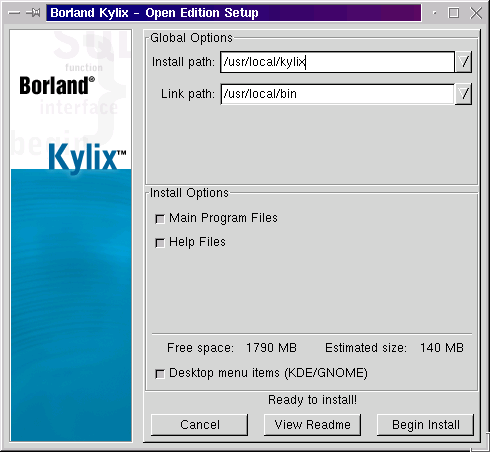
The link path needs to be set to some directory on the system path, as it is where some scripts are going to be stored that can be used to invoke Kylix, the Kylix help system and also the Kylix command-line compiler.
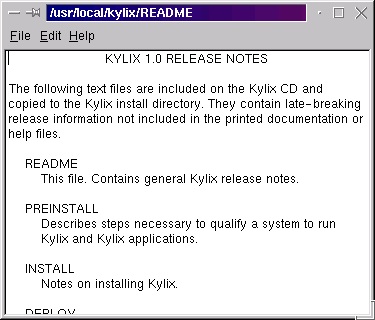
Once Kylix is installed, you should restart X to get all the menu items set up correctly, and make sure you are logged in as a normal user. More helpful information about Kylix can be found in /mnt/cdrom/README and information on deploying your Kylix applications is in /mnt/cdrom/DEPLOY.
Kylix can now be started either by using the menu item that was installed, or from a command-prompt with the startkylix command. startkylix is a script file which sets up appropriate path information, before invoking Kylix itself.
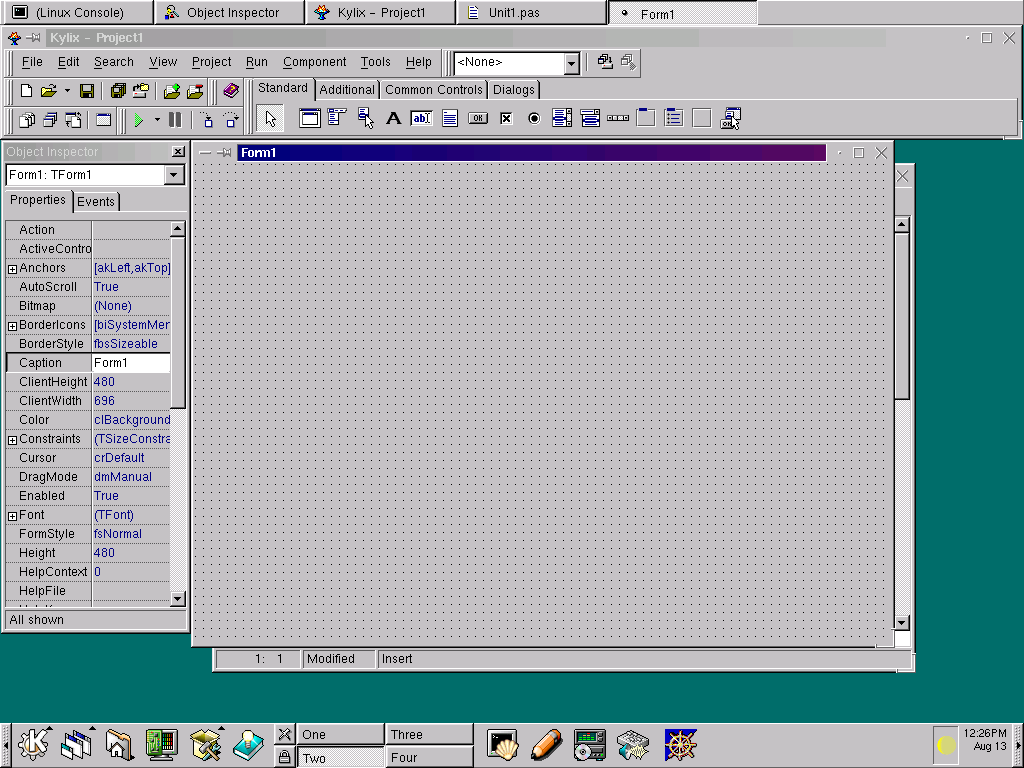
The first time you run Kylix, a white window appears and stays on the screen for some while telling you it is generating font metrics. You can safely ignore this window, as you typically will not see it again. Once this initial housekeeping is over, the Kylix Integrated Development Environment (IDE) will appear on the screen (see Figure 3).
Figure 3: The Kylix IDE waiting to be used
There's quite a lot to get to know in the IDE, so let's take a look at the available windows. The top window (Figure 4) doesn't really have a name, so is just referred to as the main window (if you close this window, Kylix will shut down). The main window contains the top-level menus (which contain many individual menu items), as well as several undockable and customisable toolbars. These toolbars contain a variety of toolbuttons, which act as shortcuts to the menu items. You can drag the toolbars around in the main window, or undock them (turn them into separate floating windows) by dragging them by the vertical double bar (called a grabber). You can also customise which buttons they display or whether they appear at all by right-clicking on any of the toolbars.
Figure 4: The main Kylix window holds menus, speedbars and the Component Palette

The remaining item on the main window is the tabbed area called the Component Palette (this can also be undocked, if desired). This is a very important window as it shows you all the components available for designing forms in your application.
A component is a program object that can be used in the Kylix visual designers, such as a button or an edit control. If you hold your mouse over the various component images on the Component Palette, tooltips appear telling you what they are. Each component has an underlying data type. For example the button component is type TButton, and has a tooltip that says Button; also the checkbox component is of type TCheckBox and has a tooltip that says CheckBox.
Kylix comes with a library of components called CLX, which is short for Component Library for Cross-platform (Cross becomes X in the acronym). The Server Developer Edition has about 165 components, the Desktop Developer Edition has about 130, whereas the Open Edition has about 50. This might be rather less than in the versions you have to pay for, but there is a lot of scope in these components so fear not.
The Open Edition's 50 components are spread across four tabs, or "pages" of components. Like the toolbars, the Component Palette is customisable (either right-click on it and choose Properties, or select the Component menu and choose Configure Palette).
A form is a generic term for either a window (a modeless form) or a dialog (a modal form). You design all forms in the same way, and you can either display them in a modeless or modal fashion to get the effect of a window or a dialog.
Unless you are designing a console application, most Kylix applications will have at least one form in them. Each form is visually designed using the Form Designer by having components placed on it whose initial property values are specified in the Object Inspector. You can see a blank Form Designer (meaning without any components placed on it) in the IDE screenshot. It is the large window with a caption of Form1 and with dots all over it.
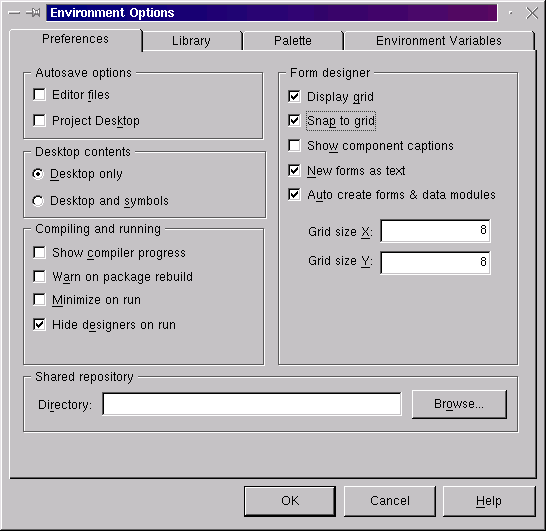
The dots are indicative of a grid that components "snap to" when placed on the form, to aid in the consistent alignment (each grid unit defaults to 8 pixels for height and width). You can customise the Form Designer, including changing the granularity of the grid and whether it is active or visible on the Preferences page of the Environment Options dialog (see Figure 5), which can be found on the Tools menu.
Figure 5: Change your Kylix settings here, if you like
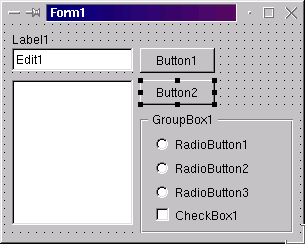
To place components on a form, click on the component image on the Component Palette then click on the Form Designer. An instance of the component will then appear on the Form Designer that can be moved around and resized, if needed. The Form Designer itself can also be resized as appropriate, as it represents a form in your application. You can place as many components as are needed onto the Form Designer (see Figure 6).
Figure 6: The Form Designer with a number of components on it
The Object Inspector can be seen in the screenshot of the IDE, to the left of the Form Designer. The Object Inspector displays the published properties of the selected component and allows you to modify their initial default values. This lets you accurately design the initial appearance of each of your forms. For example, you can set a button's caption with its Caption property.
Single-clicking a component on the Form Designer will select it (the button with the caption Button2 is selected in the screenshot above), allowing you to move it, resize it or modify its properties (see Figure 7). You can also select multiple components simultaneously, either by lassoing them (drag out a rectangle on the Form Designer which touches or encloses all components to select) or by single-clicking the first one and Shift-clicking all the rest (hold the Shift key down and single-click each subsequent component).
Figure 7: Button2's published properties
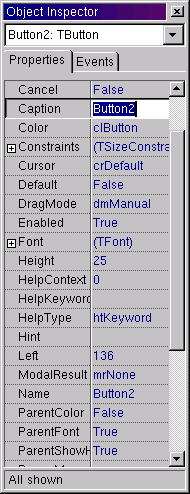
As well as allowing the properties to be set, the Object Inspector also tells you the name of the component and its type. The instance list at the top of the Object Inspector (so-called because it lists all component instances on the Form Designer, allowing you to select them) shows the type of the component, preceded by its name. The component's name can also be seen further down the Object Inspector as the value of the Name property. Since it shows up as a property on the Object Inspector, you can change the component's name just as you would any other property.
Just below the instance list, you can see that the Object Inspector has two tabs, and we are currently on the Properties tab. The other tab (Events, shown in Figure 8) shows all the events that might occur to the selected component. This is the primary mechanism for building Kylix applications; you write code that executes in response to component events (in routines called event handlers). For example, when the user presses a TButton component, its OnClick event is fired. Your OnClick event handler for the button can show a form, launch another application, terminate the application or whatever you choose.
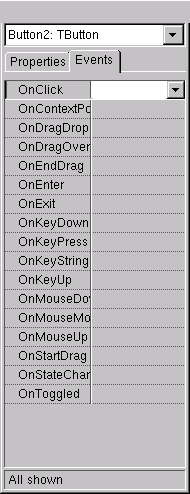
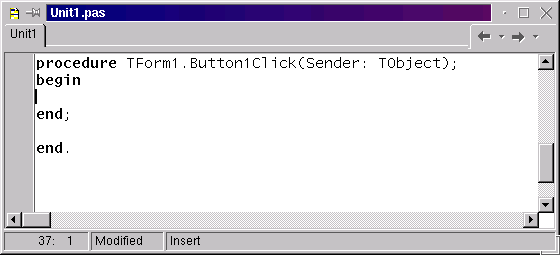
You make event handlers by double-clicking in the right hand column for the event in question (or by selecting the event in the Object Inspector and pressing Ctrl+Enter). You write the event handler code in the other window open by default when Kylix starts - the code editor (see Figure 9). It normally sits behind the Form Designer, trying to look inconspicuous, until we need to write some code (it pops up when you create a new event handler). The editor can have many files open at the same time, and it is also possible to have multiple editors open (View | New Edit Window). The screenshot above shows a new event handler for Button1's OnClick event.
Figure 9: The Kylix source editor
Kylix visual application development involves setting up components on forms, then writing event handlers for those components and forms as required. The event handlers can manipulate the objects set up at design-time, accessing their properties, or calling their methods (the subroutines defined within each object) or can make use of any other part of the CLX library. Development tools like Kylix are said to follow a PME component model, due to the components exposing Properties, Methods and Events.
Enough of this preamble - let's build an application. To start a fresh project for an executable GUI application, choose File | New Application. Kylix can create various types of output:
We will start with the timeless Hello World program, and then move onto something a little more challenging. Place a button component on the Form Designer, and use the Object Inspector (on its Properties page) to set its Caption property to: Hello World. Now switch to the Object Inspector's Events page and locate the OnClick event, which is fired when the button is pressed (i.e. clicked). Double-click in the right column (or select the event and press Ctrl+Enter) to create an event handler for the event. On the blank line between the begin and end enter this statement:
ShowMessage('Hello World')
ShowMessage is a simple CLX routine that produces a dialog whose caption matches the application title (the executable name by default) with a label in whose caption is the specified string. To test this application, choose Run | Run, or press F9 (or the toolbutton with the green triangle on). Kylix will compile your source code and link it into an executable and then launch that executable. The program will appear as a grey form, the same size as the Form Designer you were using, with a button on it. When the button is pressed, a message box appears saying Hello World (shown in Figure 10).
Figure 10: Our first Kylix app
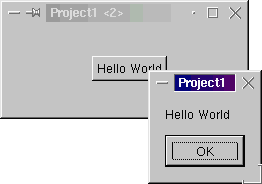
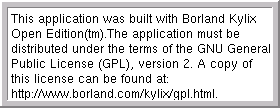
You will also notice that, as the program starts, the Kylix Open Edition banner that appears as a modal, border-less stay-on-top window and lasts three seconds (shown in Figure 11). Note that trying to modify this banner contravenes the Kylix Open Edition license agreement, but it is useful to know that clicking it makes it disappear, and that the -ns command-line parameter can be passed to any Open Edition application to prevent the dialog from appearing at all. From the IDE, you can specify command-line arguments by choosing Run | Parameters... and entering them into the Parameters field.
Figure 11: The Open Edition application banner (or nag screen, if you prefer)
When you have finished playing with this simple program, close it and the Kylix IDE will come to the foreground again.
Now go back to the ShowMessage call in the editor, and precede it with a couple of additional statements, so the event handler looks like this:
procedure TForm1.Button1Click(Sender: TObject);
begin
  Form1.Caption := DateToStr(Date);
  Button1.Hide;
  ShowMessage('Hello World')
end;
As well as calling a global message box routine, the button's event handler now changes the form's caption to the current date (by assigning a string representation of the date to its Caption property) and also calls a method of the button to hide it. If you run the program again (F9), you should only be able to press the button once to generate a message box, as it will disappear when you do so.
This trivial program now has all the key elements of a Kylix application:
These are the seeds that will grow into all our Kylix applications from now on. Don't worry too much about Object Pascal syntax right now, we'll look at the most important parts of it as this tutorial series progresses.
At this stage, you can throw this project away. File | Close All will prompt you to save the project, but pressing the No button makes Kylix forget all about it.
The next project we will work on will be a simple text editor. We'll explore how to build it next month, as space is short for this first instalment. However, the project files can be downloaded by clicking here. Copy the files into some directory on your machine and then from Kylix, choose File | Open Project... and open TextEditor.dpr.
When you run the program you will see this is a simple text editor that allows you to open, edit and save text files and also create new text files. This will be what we cut our Kylix teeth on next time and enhance with images and toolbars and so on over time. Also next month, we'll look at the files generated for Kylix projects and start putting our hands to some real coding.
Figure 12: Next month's project is a text editor application
Brian Long used to work at Borland UK, performing a number of duties including Technical Support on all the programming tools. Since leaving in 1995, Brian has spent the intervening years as a trainer, trouble-shooter and mentor focusing on the use of the C#, Delphi and C++ languages, and of the Win32 and .NET platforms. In his spare time Brian actively researches and employs strategies for the convenient identification, isolation and removal of malware.
If you need training in these areas or need solutions to problems you have with them, please get in touch or visit Brian's Web site.
Brian authored a Borland Pascal problem-solving book in 1994 and occasionally acts as a Technical Editor for Wiley (previously Sybex); he was the Technical Editor for
Mastering Delphi 7
and
Mastering Delphi 2005
and also contributed a chapter to Delphi for .NET Developer Guide
.
Brian is a regular columnist in The
Delphi Magazine and has had numerous articles published in Developer's Review,
Computing, Delphi Developer's Journal
and EXE Magazine. He was nominated for the Spirit
of Delphi 2000 award.