

Brian Long Consultancy & Training Services
Ltd.
March 2011
Accompanying source files available through this
download link
The simple application above has all the functionality in the App Delegate, which
purists might suggest is best left to act as a delegate for the CocoaTouch Application
object. Typical applications are more likely to use one or more view controllers
(UIViewController or a descendant) as delegates for views on the various
windows in the application. You get a view controller in the application if you
start with the iPhone Navigation-based Project template or iPhone Utility Project
template in MonoDevelop. Let’s make a new Navigation-based project.
The project we get from this template has a window and an App Delegate as before,
but importantly also has a Navigation Controller, which works with a Navigation
Bar. The idea of this is to support the common workflow in an application of going
from one screen to another, and then maybe to another, etc., and being able to readily
navigate back to any of those earlier screens. iPhones facilitate this using a Navigation
Bar under the control of a Navigation Controller. The Navigation Bar reflects which
screen you are on, where each of the navigable screens is actually a UIView
descendant.
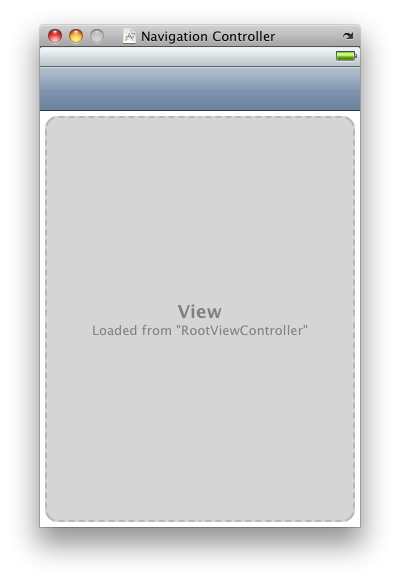
Note: when you double-click MainWindow.xib there are potentially two UI windows opened up by Interface Builder, as the .xib file defines both the main window, which is completely blank, and also the Navigation Controller, which has the Navigation bar etc. on. You can readily open up whichever one you choose using the Document Window.
The template sets us up a UITableView as a starting view with a corresponding
UITableViewController, suitable for showing a very customizable list
in a manner iPhone users will be very familiar with. As items are selected in the
table (or list) the application has the option to navigate to other pages.
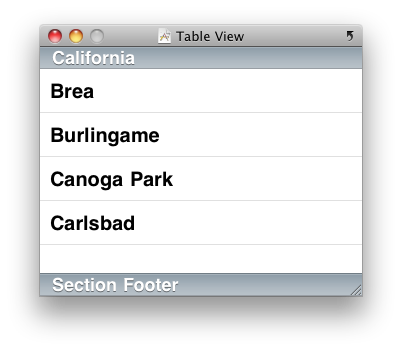
When you look at the two .xib files in Interface Builder you see the blue Navigation Bar at the top of the main window (you can give it some text by double-clicking it) as well as an indication that the rest of the window content comes from RootViewController.xib. This latter nib file file just contains a Table View, which is shown populated with sample data.


We’ll see how this UITableView works by displaying some information
from an SQLite database. The coding will take place in the source file that is associated
with the Table View nib file: RootViewController.xib.cs (not to be confused with
the code behind file, RootViewController.xib.designer.cs).
Before worrying about the table, we’ll get some code in place to create a database, a table and some sample data when the main Table View is loaded. To keep things tidy we’ll also delete the database when it unloads, though clearly a real application may need to keep its database around between invocations. The contents of the database table will be read from the database and stored in a strongly typed list. Again, consideration should be given to memory requirements in a real application; in this sample there will only be a handful of records.
Since the list is to be strongly typed we’ll need a type to represent the data being read:
public class Customer
{
public Customer ()
{
}
public int CustID { get; set; }
public string FirstName { get; set; }
public string LastName { get; set; }
public string Town { get; set; }
}
The ViewDidLoad() and ViewDidUnload() overridden methods
are already present in the template project so here’s the extra code that uses standard
ADO.NET techniques with the Mono SQLite database types.
Note: This code requires you to edit the References used by the project (right-click on the References node in the project in the Solution Explorer and choose Edit References...) and then add in System.Data and Mono.Data.Sqlite to the list.
using System.Data;
using System.Collections.Generic;
using System.IO;
using Mono.Data.Sqlite;
...
SqliteConnection connection;
string dbPath;
List<Customer> customerList;
...
public override void ViewDidLoad()
{
base.ViewDidLoad();
//Create the DB and insert some rows
var documents = Environment.GetFolderPath(Environment.SpecialFolder.Personal);
dbPath = Path.Combine(documents, "NavTestDB.db3");
var dbExists = File.Exists(dbPath);
if (!dbExists)
SqliteConnection.CreateFile(dbPath);
connection = new SqliteConnection("Data Source=" + dbPath);
try
{
connection.Open();
using (SqliteCommand cmd = connection.CreateCommand())
{
cmd.CommandType = CommandType.Text;
if (!dbExists)
{
const string TblColDefs =
" Customers (CustID INTEGER NOT NULL, FirstName ntext, LastName ntext, Town ntext)";
const string TblCols =
" Customers (CustID, FirstName, LastName, Town) ";
string[] statements = {
"CREATE TABLE" + TblColDefs,
"INSERT INTO" + TblCols + "VALUES (1, 'John', 'Smith', 'Manchester')",
"INSERT INTO" + TblCols + "VALUES (2, 'John', 'Doe', 'Dorchester')",
"INSERT INTO" + TblCols + "VALUES (3, 'Fred', 'Bloggs', 'Winchester')",
"INSERT INTO" + TblCols + "VALUES (4, 'Walter P.', 'Jabsco', 'Ilchester')",
"INSERT INTO" + TblCols + "VALUES (5, 'Jane', 'Smith', 'Silchester')",
"INSERT INTO" + TblCols + "VALUES (6, 'Raymond', 'Luxury-Yacht', 'Colchester')" };
foreach (string stmt in statements)
{
cmd.CommandText = stmt;
cmd.ExecuteNonQuery();
}
}
customerList = new List<Customer>();
cmd.CommandText = "SELECT CustID, FirstName, LastName, Town FROM Customers ORDER BY LastName";
using (SqliteDataReader reader = cmd.ExecuteReader())
{
while (reader.Read())
{
var cust = new Customer
{
CustID = Convert.ToInt32(reader["CustID"]),
FirstName = reader["FirstName"].ToString(),
LastName = reader["LastName"].ToString(),
Town = reader["Town"].ToString()
};
customerList.Add(cust);
}
}
}
} catch (Exception)
{
connection.Close();
}
this.TableView.Source = new DataSource(this);
}
public override void ViewDidUnload()
{
// Release anything that can be recreated in viewDidLoad or on demand.
// e.g. this.myOutlet = null;
//Delete the sample DB. Pointlessly kill table in the DB first.
using (SqliteCommand cmd = connection.CreateCommand())
{
cmd.CommandText = "DROP TABLE IF EXISTS Customers";
cmd.CommandType = CommandType.Text;
connection.Open();
cmd.ExecuteNonQuery();
connection.Close();
}
File.Delete(dbPath);
base.ViewDidUnload();
}
After all that code that’s the Table View itself done. The remaining work is done
in the Table View’s DataSource class, a descendant of UITableViewsource.
You’ll notice a DataSource object being set up at the end of the template
code in ViewDidLoad(), though in the sample project it has been renamed
to CustomerDataSource. The data source class is set up in the template
as a nested class defined within the Table View controller with a number of its
virtual methods already overridden for you.
Tables can be split into multiple sections, each (optionally) with its own header.
Our customer list will not need additional sections so NumberOfSections()
should return 1. To tell the Table View how many rows should be displayed in this
single section, RowsInSection() should return controller.customerList.Count
(controller is set in the constructor, giving access to the view controller).
To give the section a header you need to override the method TitleForHeader().
Overriding virtual methods is easy in MonoDevelop; type in override
and start typing the method name and the Code Completion window will appear showing
your options. Have it return the string Customers.
To populate the cells we use the GetCell() method, whose parameters
are the Table View and the cell’s index path (the section number and row number
within the section given by the Section and Row properties).
The first thing to note about the code below is the innate support for virtual lists
through reusable cells. If you wanted to display a very long list it may not be
practical to create a UITableViewCell for every item due to the memory
usage required. Instead you can take advantage of the Table View offering any cell
that is scrolled off-screen as reusable. You can have various categories of reusable
cells by simply using different cell identifiers.
public override UITableViewCell GetCell(UITableView tableView, MonoTouch.Foundation.NSIndexPath indexPath)
{
string cellIdentifier = "Cell";
var cell = tableView.DequeueReusableCell(cellIdentifier);
if (cell == null)
{
cell = new UITableViewCell(UITableViewCellStyle.Subtitle, cellIdentifier);
//Add in a detail disclosure icon to each cell
cell.Accessory = UITableViewCellAccessory.DetailDisclosureButton;
}
// Configure the cell.
var cust = controller.customerList[indexPath.Row];
cell.TextLabel.Text = String.Format("{0} {1}", cust.FirstName, cust.LastName);
cell.DetailTextLabel.Text = cust.Town;
return cell;
}
This code creates cells that permit a text value and an additional smaller piece
of text (a subtitle). These are accessed through the TextLabel and
DetailTextLabel properties respectively.
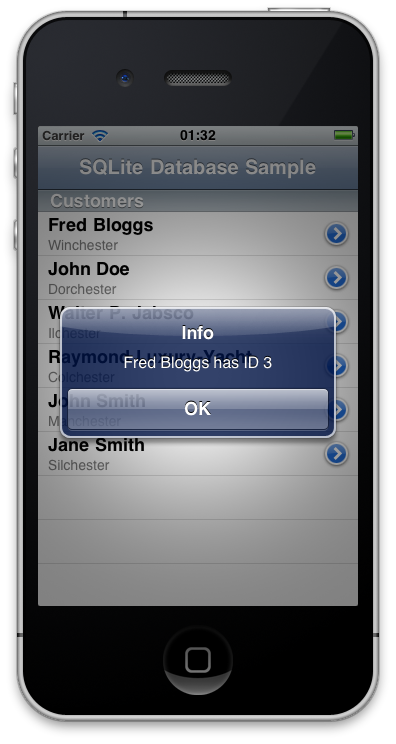
During the cell setup a detail disclosure button is also added in. This adds in
a little arrow in a circle on the right side of each cell. This then gives us two
possible actions from the user: they can tap the row in general, which triggers
RowSelected(), or tap the disclosure button, which triggers AccessoryButtonTapped().
Often, RowSelected() is used take you to another screen, so in this
case we will leave RowSelected() doing nothing and just support the
disclosure button, which issue’s an alert displaying some information about the
selected customer. However, it is down to you to check
Apple's Human Interface guidelines and decide whether ignoring RowSelected()
is acceptable practice.
public override void AccessoryButtonTapped(UITableView tableView, NSIndexPath indexPath)
{
var cust = controller.customerList[indexPath.Row];
InfoAlert(string.Format("{0} {1} has ID {2}", cust.FirstName, cust.LastName, cust.CustID));
}
All of which gives us this application:

Go back to the top of this page
Go back to start of this article